2020 Winter Carnival Remix

I led two coding sessions at the middle school for their Winter Carnival again this year. I had a new collaborating teacher this time and we were in the computer lab on desktops (instead of Chromebooks).  We had a variety of ability levels and grades in attendance.  Some were brand new to Scratch and others were part of the middle school’s code club.  That’s another new thing at the middle school. Some of my former elementary Code Club members started a code club this year that happens once a week during one of their study halls. (Super proud of them for advocating for themselves)

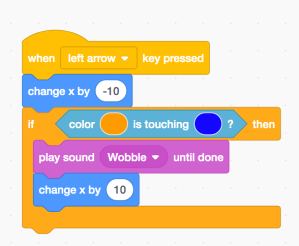
I wanted to offer different projects than last year but projects that would still be interesting to both beginners and more advanced coders.  We settled on Flappy Parrot and Pong.  I am also really interested in Text-to-Speech and Computer Poetry Generation and my collaborating teacher is excited about Makey-Makey devices.  So we offered both of those as well although none of the middle schoolers decided to work on those types of projects.

I set up a studio in my teacher account and added a few starter projects prior to Winter Carnival. During each session, I collected the students’ Scratch usernames to add them as curators.  This didn’t always work out as some were creating accounts on the spot and then never received an email verification.  I think the issue is on our district’s end and not Scratch’s.  I think some students’ emails are locked down more than others.

Screen Shot 2020-02-16 at 1.17.03 PM

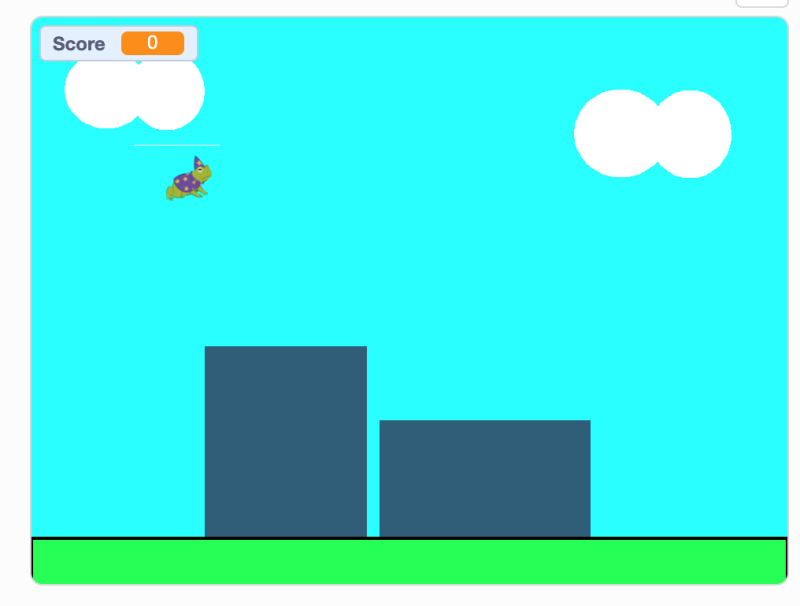
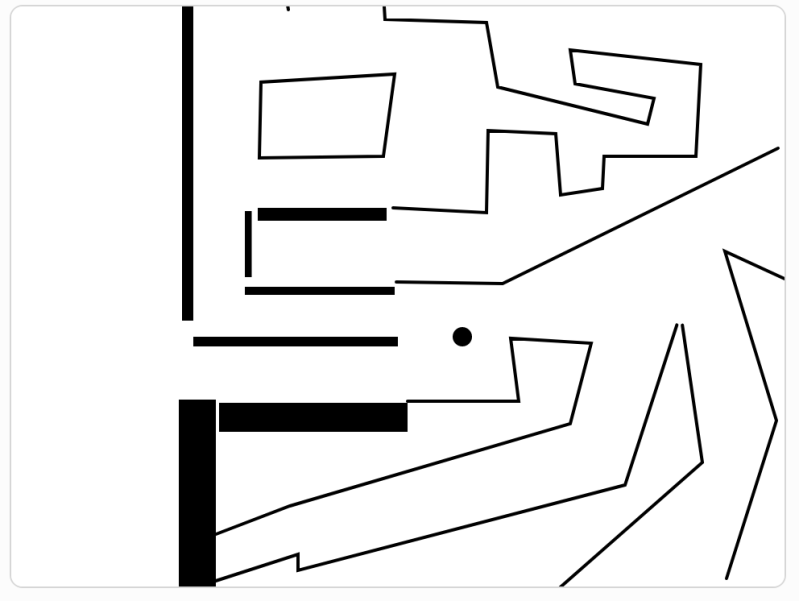
Toad Dash example Flappy Parrot/Geometry Dash project

Screen Shot 2020-02-16 at 1.19.08 PM

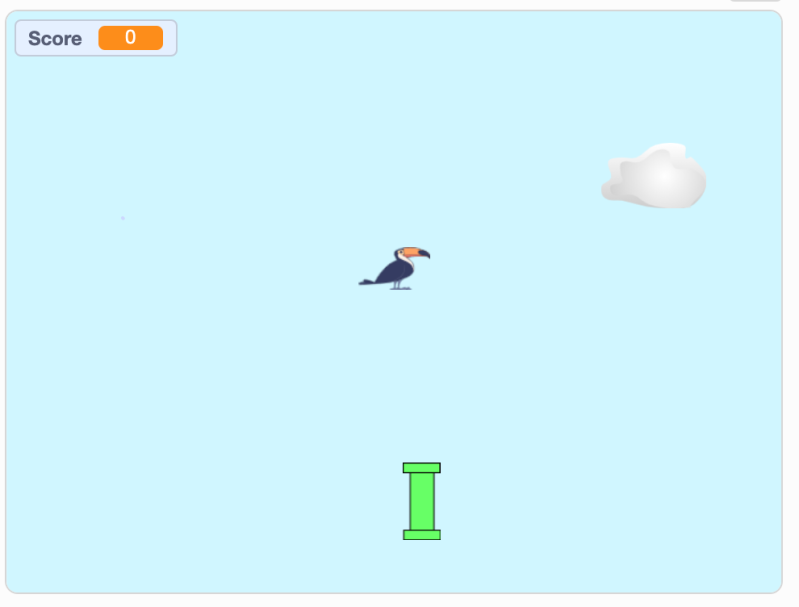
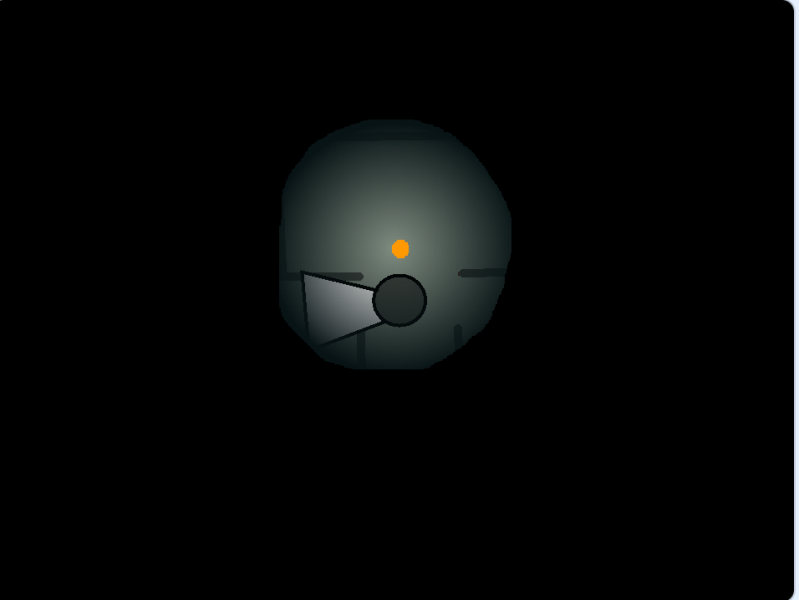
Co-teacher’s Flappy Parrot example – gradually gets harder

For those who couldn’t get their new Scratch accounts to work, we downloaded their completed Scratch 3 project to the desktop and uploaded it through my teacher account.  Once their account is activated, they’ll be able to remix it into their own account, if interested.  This is one of those technical issues that you have to work out on the fly.  I also opened the studio to accept projects from anyone temporarily.  It turns out that unconfirmed Scratch accounts can’t “share” projects.  This is not a bad policy.

I was really nervous about coding with the middle schoolers again. I’m not with them on a day-to-day basis to understand what they like. I know a lot of them but I don’t know what they are learning in their code club.  One name on the roster was a student I’d recently seen write Python code in real-time, and in front of an audience, that simulated a ball bouncing. (I know it was rehearsed performance and she had a partner, but still super impressive… Would flappy parrot or my other intro projects interest her?)

The kids were great.  They brought their creativity, enthusiasm and worked hard.  They were kind.  They helped each other and enjoyed themselves.  I had a good time with them and enjoyed seeing what they were interested in. They created impressive projects and were willing to share them with the group.  I made sure there was time at the end of each session to enjoy (play, comment & like) each other’s projects.  All but one were willing to put their “work in progress” out into the world for others to play.  Very impressive and brave for middle school kids.

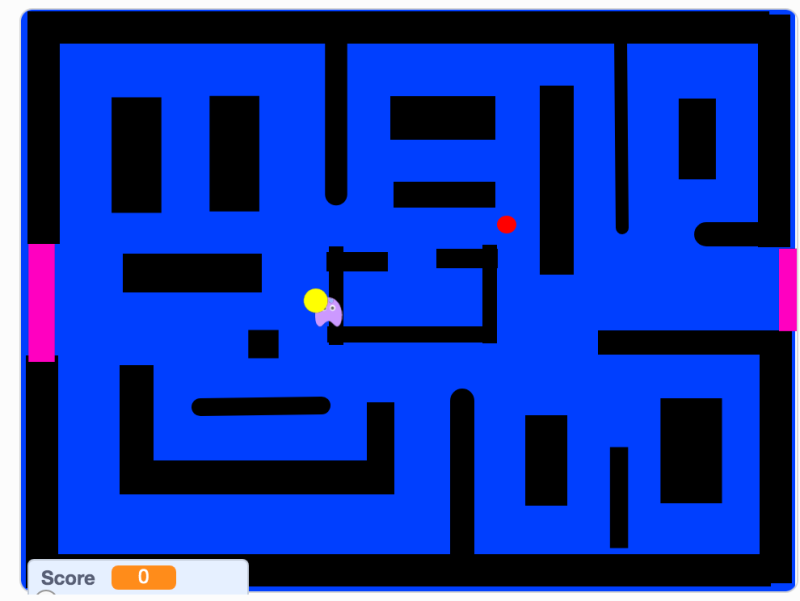
During the first session, one new-to-Scratch student was looking for inspiration so I helped him add a picture of a bag of Skittles as a Sprite to his project.  I stayed to help him make the Skittles bounce around the screen.  I came back to see he had a bunch of Skittle bags bouncing around the screen.  I asked if he wanted to make a game where you have to avoid the bags of Skittles and offered him the project instructions for Space Junk. Later I showed him how to have the Skittle bags come in at staggered times to simulate increasing levels of difficulty. The longer you stay alive, the more Skittles bags are zooming around after you. Then he wanted to add a coin to collect for a score, or in this case a “Skittle”.

Screen Shot 2020-02-16 at 1.55.07 PM

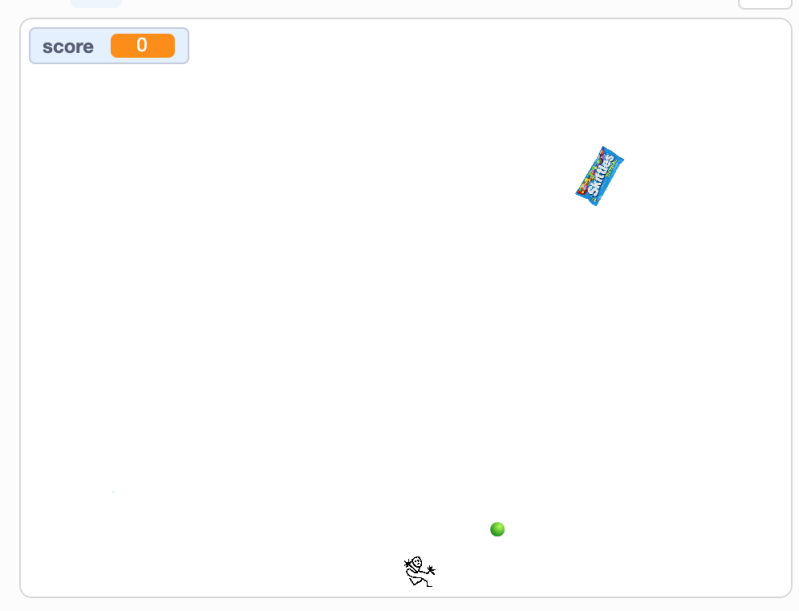
Skittles Escape became one of the more popular games of the day and it was made by a first-time coder.

This game of his, Skittles Escape, garnered much attention in the first session and was remixed a few times in the second session. Well done, first-time Scratcher!

Remixed Skittles Escape projects:

Some other notable projects:


And this cool take on flappy parrot:

Screen Shot 2020-02-16 at 2.09.51 PM

All of the creative projects are in this studio 2020 LMS Winter Carnival. They represent the individuality of the coders who made them.  I hope I can return next year to facilitate creative coding again.

3d Printing Art Class

I’ve been working with AVA Gallery and Art Center, a local art gallery that offers a large variety of art classes, workshops, and drop-in sessions, to develop a 3d printing class for middle school students. My first class offering is a 5-week, afterschool, 2-hour class for a maximum of 8 students. AVA has a media lab with desktop computers and room to set up my class.

I am supplying my own 3d printers and filament. I have acquired 4 Monoprice mini delta 3d printers for use with the class.  I use a delta printer to run a demo when I’m selling my 3d printed earrings and magnets.  They are highly portable and fun to watch.  We print a different figurine during the summer farmers market each week. Kids are always stopping by to see what we are printing (adults, too).  It generates a lot of curiosity and questions about 3d printing.

IMG_2116

Monoprice Mini Deltas running

For this first session, I have 3 students signed up, 2 girls and 1 boy.  The low number is fine with me because it gives me a chance to run through the mechanics of the class, seeing if my lessons hit or miss.  The students are young middle schoolers – 5th and 6th grade.  I know two of them as they are local and used to go to the elementary school where I work.

My plan for the 5 weeks was to start with BeetleBlocks– rings, nameplates, and Turtle-logo like pendant designs, then switch to TinkerCAD and go from there.  On the first day, I found out that only one of them liked jewelry and was excited about rings, earrings, and necklaces.  The other two, not so much.   They coded and printed rings in BeetleBlocks but weren’t interested in going through the iterative process to reprint them to fit better. Oh well.  While the rings were printing they explored BeetleBlocks, made nameplates or checked out community made designs, but then they were done.

Screen Shot 2020-02-04 at 10.40.12 PM

The next week I introduced TinkerCAD.  I showed them different options for TinkerCAD and let them explore but didn’t direct them to make anything specific.  One student had a very specific figurine in mind but only a beginner’s set of skills and became frustrated. The computers in the lab are also really slow and TinkerCAD was lag-y.  I was telling them to click and breathe for a bit there. One student worked on his project from home and reported that it was quite a bit less frustrating.

IMG_2213

TinkerCAD design worked on at home.

On the third week, I decided to introduce them to lithophanes since TinkerCAD was painful to use.  We went to http://3dp.rocks/lithophane/ and uploaded a photo.  I need to play with the settings a bit more, but Deltas print 3d lithophanes very nicely since the bases don’t move.

IMG_2214

Lithophane photo printing vertically.


Next week we are going to search Thingiverse and find something to print. I hope Thingiverse isn’t laggy.  It has trouble loading projects even on a good day. I have an idea for the last week. I think we will make a mobile of our 3d prints to showcase the class and hang it in the AVA.

The students are getting skilled at running the deltas -preheating, loading the filament, extruding, printing. I’m doing the slicing and the gcode generation this time.  I’d thought to install Slic3r on the computers in the media lab and teach the students to slice and generate gcode, but I’m currently doing those steps.

A note for utilizing printer time during class:  As one project is printing, the student work on the next project to have ready to print at the beginning of the next class.  If there were more students, I’d probably have to spend more time out of class printing.

Mazes, the Dark Side

At the last Creative Coders Code Club, I asked my middle schoolers what they wanted to learn or work on next time. One student said a platformer and another was interested in a MAP (multi-artist-project).  While I’m still investigating how to facilitate a MAP with my group, I thought the easiest form of a platformer game would be to learn to code a maze. Mazes can be simple “navigate to the goal and don’t hit the walls”, or complex with levels, bad guys, goals, timers, scoring, (like platformers).

I found a couple of starter projects for mazes.  I liked the one from the Scratch Team (classic example) and from CSFirst.  I looked through and found a couple of other examples of mazes to include as examples.  I also came across a PacMan starter project from MEStech.  PacMan is a nice example of a classic platformer that’s like a maze. And who wouldn’t want to create their own PacMan game?

I’ve always wanted to make a 3d maze but am not interested in learning 3d rendering and the other way I was thinking to make it required too much planning. My spouse gave me the prompt to make a dark maze where you can’t see the whole path. So I spent a while creating a Sprite to look like darkness around a lighted lantern.

I knew I could use a gradient fill from black to alpha 0, but I had trouble creating the size of the lantern light that wouldn’t reveal too much of the path.  My third try worked well but I’ve decided that I am not a fan of the Scratch 3.0 vector tools.

Screen Shot 2019-12-02 at 9.53.37 PM

Just the right size of light in the darkness.

I had to change the implementation of wall detection.  I couldn’t use “when touching blue” because my Sprite is supersized. So I changed it to “when orange is touching blue”Screen Shot 2019-12-02 at 10.02.33 PM

I still had areas of the map that were visible beyond the edge of my Sprite.  I thought I could increase the size of the Sprite to 200% to cover it but the maximum I could set the Sprite to was 135%.  Instead, I created two blackout Sprites the appear or hide depending on which quadrant I was in.  I’m pleased with the results although it needs a better map and more levels, etc.  It’s basically still a starter maze…

Today was our club meeting but it was also a snowy day.  School wasn’t canceled locally so we held the club but we only had three members attend.  One adapted my blackout maze idea with his own map and bad guy.

Another created his own impossible maze

And the third tried to do both PacMan and a maze and was frustrated with what he could accomplish.  It was his first time and he spent time just playing with Scratch options (which I totally support – you got to know what is possible before you can create).

Sometimes I feel 75 minutes once a month is not adequate time or frequency to facilitate the opportunity to play with Scratch, be creative and produce something to share with the group. It makes it tricky to plan lessons that fit a wide range of skills and inspire middle school students.

3d Printing Club

I have wanted to run a 3d printing club for middle schoolers for a while now (since I discovered BeetleBlocks).  I specifically wanted to have a 3d printing club where we focused on jewelry making in hopes of getting MS girls interested in STEM. I have a 3d printing business and sell my 3d printed jewelry on Etsy and at the Lebanon Farmer’s Market. I see many of my students at the market and know that 3d printing jewelry might be the hook to get more girls interested in 3d printing.

Screen Shot 2019-07-17 at 9.10.43 AM

My earring design ready for sale – a shared project on BeetleBlocks

Yesterday my dream of having a 3d printing club became a reality at the Lebanon Public library and with the collaboration of two librarians. We were able to borrow two 3d printers from libraries around New Hampshire and schedule a couple of summer sessions.  We met a week prior to the first session, when we had the printers, to make sure we could run them and change the filaments, etc.  We have an Ultimaker 2 Go and a MakerBot Replicator.  This is a bit complicated as they take different size filaments and use different programs to prepare the models.  We have some jewelry findings and different color filaments – silver, gold, bronze in 1.75 mm for the MakerBot and blue in 3 mm for the Ultimaker.

We were hoping to get 3 printers and have 3 students per printer for a group of 9, but only 5 had signed up so we opted to go with just 2 printers as the third was at a library on the other side of the state.  When I got there on Monday, there were 9 students.  The librarians had decided to let the drop-in students stay and I was fine with that.

Screen Shot 2019-07-17 at 9.14.52 AM

My notes for my intro to the 3d design & printing process.

After a brief introduction where I wanted to make sure that they understood 3d printing was an iterative process not unlike the engineering design process, I showed them a jar full of bad prints from my jewelry printing business.  Then we got started.

Screen Shot 2019-07-17 at 9.09.47 AM

For the first of the two sessions, I introduced BeetleBlocks and we created simple rings by measuring and using a tube shape (Here’s my video tutorial). In just three lines of code, the rings were created and we were able to have them export and save to a flash drive/sd card.  We loaded half onto one printer and half onto the other and started printing them. Rings take about 5-9 minutes each.  The goal was to have something to take home by the end of the session. Then during the week they could drop in and print another, bigger, individual print like a pendant or a pair of earrings, etc.. The librarians had a list of times when they would be available during the week to help the students print another ring or a pendant.  I thought this would alleviate the problem of having enough class time to get everything printed.

I created a second video tutorial on how to code a pendant or earring from a squiggle. There wasn’t time to go over the whole tutorial during the session and anyway students were busy exploring BeetleBlocks: adding their names to the rings, looking at community projects, playing with extrusions and other shapes. While some just wanted to watch the printers for a while.

Screen Shot 2019-07-17 at 9.09.02 AM

Extrusion pendant by a middle school coder

Next week we are going to explore TinkerCAD as another application that I know that makes it easy to create 3d designs.

LMS Winter Carnival

Last week I ran two coding sessions at the middle school for their Winter Carnival.  There are a wide variety of activities offered for the 5th- to 8th-grade students during the morning, divided into two 1.5 hours sessions. Options ranged from skiing, dancing, and ping-pong, to cookie decorating, tic-tac-toe, and D&D.  I was invited to offer Scratch coding.

My activity, Coding/Scratch, had this description: “Students will have the option to create a game, animation or pursue a passion project of their choice using Scratch 3.0 coding environment.”

Despite the unlimited options in the description, I wanted to offer some project guidance as I didn’t know the coding experience of those who would sign up. I decided on three projects from Code Club World that in my experience offer students the greatest creative choice coupled with step-by-step instructions.  The first option was Chatbot.  I’ve discussed how much I like this project before and with the added text-to-speech options in Scratch 3.0, I knew this would be a hit. The second option was a “clicker game” presented with Code Club World’s Ghostbusters project.  The third project was the “side-scrolling platform game” Flappy Parrot from Code Club World.  I feel any of these three projects can be accomplished in 1.5-hours with this age group.

In preparation, I went through and created starter versions of these projects. I also set up a Scratch studio for everyone to share their projects. Once the students were logged into Scratch (some had to make their own, new accounts), I invited them to be curators so they could add their projects to our group studio. This part required a bit of administrative time but it is not difficult and works well for everyone to have a single place to go to play each other’s projects. I feel it is important to carve out time to share and showcase what everyone has accomplished, knowing that we all had a limited amount of time and that the projects aren’t perfect or even finished.

About ten students signed up for each session but only one girl in each session.  One of the math teachers joined me- she is eager to learn Scratch and we work well together.  I knew more than half of the students and some of them were with me in past Code Clubs. I think the students had a good time. I definitely feel like we supported their ideas and creativity. I’d love to get feedback from them. I shared the project studio with the school administrators and they thanked me for participating.

Screen Shot 2019-02-22 at 3.13.51 PM

Chungus Run – a creative Flappy Parrot game – good instructions, too 

Some notes from the sessions:

  • Time management is key with short sessions – I posted our schedule – Intro 10min/ Plan 10min/ Code 55min/ Share 15min
  • The project guides were helpful even if only to get them started before they went off on coding tangents.
  • These students showed creative, flexible thinking. Scratch supported their creativity by making coding flexible to their ideas.
  • It is difficult to share something you know is incomplete.  I announced a time check at 15 minutes before we wanted to share, so no one was caught unaware.
Screen Shot 2019-02-22 at 3.17.30 PM

Fishie Click game – former 4th grade Code Club member

Coding projects are like art – they are never really “finished” or “perfect”.  They are “done” when you decide to stop working on them. – I said this to someone who was bemoaning the end of the coding time and another student laughed.  She clarified that she was an artist and understood that fact very well.

Screen Shot 2019-02-22 at 3.16.38 PM

The Majestic Bird – Well done and so annoying!


New Year, New Scratch

Creative Coders Club on Monday was one of our best sessions ever.  The kids were really creative and funny and fun to work with.  The kids that came were all returnees and familiar with Scratch.  It was their first time working with Scratch 3.0 and despite a few grumblings about where familiar tools went, they were able to create some creative projects.  For such young people, they really seem upset about the changes to their coding environment.  I’m sure they will get used to the new version and not look back.

When I was looking for a project this month I noticed the tutorial from Cartoon Network on Animating an Adventure Game.  I knew the Creative Coders had been wanting to make an adventure-type game.  I added this option to our January studio and went through the tutorial myself so I could field any issues.  It has some fun character Sprites but turns out to be a simple “collect the gems” game. I felt it was a nice option for the club.

I also looked at the Scratch Design Studio for January.  I’ve been looking at the prompts each month since the Scratch Conference in August, hoping to find one that would work for this club.  The current theme is the Year 3000.  I felt it would really bring out their imagination and creativity.

I started out our meeting with a “Happy New Year” and a question for them. Did things seem different now that it was 2019 or did things just seem the same?  I told them that when I was their age, computers weren’t for kids and that 500 years ago books weren’t for kids either.  Then we brainstormed about what the year 3000 would be like.  That was the first hook.

Then I read them the Scratch Design Studio description.  I really liked some of the questions it asks, like what will food be? like or how will we dance?  It sparks the imagination. They shared their ideas and I had a difficult time getting them to not share all at once.

Next, I showed them the project I made about the year 3000.

screen shot 2019-01-08 at 9.18.15 pm

My sample Year 3000 project

The other hook was the text-to-speech extension in Scratch 3.0.  screen shot 2019-01-08 at 9.29.24 pmI had read that some of the tools from Scratch 2.0 – like music and pen blocks – had been moved into the extensions section.  When I went looking, I found the text-to-speech extension.  It is easy to implement and works great.


I knew it would be a hit with the Creative Coders, and I was right.  (My only worry would be about the appropriateness of the middle school students – and I let them know, a few times, what my expectations were).

Everyone incorporated text-to-speech in their project and everyone used it appropriately. Whew.

There is not much time in an hour to imagine and create a project but the kids managed to work hard and when I told them they had only 10 minutes to get something ready to share, a few of them revised their big ideas into something manageable.  Two (of ten) said they would finish later.

In the last ten minutes, I showcased the projects they made and added to our January 2019 studio.  We laughed and enjoyed each other’s creativity and imagination.

screen shot 2019-01-08 at 9.43.33 pm

The very funny “So boring” Year 3000.

screen shot 2019-01-08 at 9.47.53 pm

Another very funny text-to-speech Year 3000 project.

I highly recommend trying out the text-to-speech extension blocks and the different voices.  It is a little tricky to have the “text-to-speech” and “say” blocks sync up (like closed-captioning) but is worth it to be able to see and hear the project.

I hope some of them submit their projects to the Scratch Design Studio and I hope next months SDS theme is just as fun.

Happy New Year and kudos to the Scratch team for a great new version!

Create Your Own World

I don’t usually blog in the summer, but I’m running a weekly summer code club at the library in July and I’m being a bit reflective about the monthly one that I helped lead this last year.

Earlier in the year, I introduced a new (to me, too) project to the Lebanon Library Creative Coders. We decided to take two of our monthly meetings, February and March, to work on the Create Your Own World project from Code Club World.  I knew this middle school age group would enjoy creating a platform game. One of them even continued to work on it for a third month and was able to add a lot of detail like hit points, inventory list, and bad guys.


Screen Shot 2018-06-29 at 8.05.47 AM

World detailed with inventory, hp, weapon and bad guys.

The first meeting we focused on setting up the player movement.  We remixed Code Club Rik’s Resources for this project so we could jump right in with the coding.  When I was prepping for our meeting, I went ahead and changed the character from a square to an overhead view of a guy walking.  One of my original groups of students created Showcase projects called Tomb of Terror and Shadow Swamp with Hatty McWalker.  That’s who I was thinking of with this guy.

Screen Shot 2018-06-29 at 7.49.15 AM

Overhead view of my player.  I added a costume with the mirror image and a “next costume” block in my code to make him look like he is walking.

The Creative Coders were certainly creative with the movement options.  I’m used to using arrow keys for movement, but these middle schoolers liked ASWD and this creative ghoulish option with side arrows for turning and up for forward:


I’m finding it useful to look at the code more closely.  There are some interesting, creative coding going on and I’m seeing some misconceptions that will help me help them debug their code.

Screen Shot 2018-06-29 at 7.27.01 AM

Well coded ASWD movement and wall checking

I’ve seen this forever-forever coding before. Something is not working like they expect and they try to solve it with nested forever loops.

Screen Shot 2018-06-29 at 7.27.37 AM

Nested infinite (practically) loops didn’t fix the problem – switching to the “play sound until done” block did.

Or they are checking for an event and forget to put in the forever loop:

Screen Shot 2018-06-29 at 7.55.25 AM

One time event checking?

This wall checking code has been separated from the key-press event giving no response.

Screen Shot 2018-06-29 at 8.02.31 AM

If touching wall move in all directions at once.

A couple of the coders explored more blocks where you can define your own.  This led to a teaching moment for me to explain how these function blocks worked.  It turned out less useful than my right-click to duplicate code suggestion.


All in all, they impressed me. In the moment I’m not always sure what is going on with everyone and even at the end when we stop to share what we’ve accomplished I don’t always know how they did.

Some of them didn’t want to continue what they had started the month before, but they were self-motivated and independent enough to work on their own projects.

I love that this crew is supportive of each other and willing to share their ideas and compliments.

Screen Shot 2018-06-29 at 7.23.54 AM

I appreciate good, supportive commenting

Some of the same students have signed up for the summer session. I’m looking forward to it.