Virtual Showcase 2022

Last week was my 13th showcase of projects for my 4th grade after-school Code Club and my 2nd one that was held virtually. We made it. After three weeks of working on their major independent project and some online meeting craziness, they presented 14 final (or near-final) projects.

For our virtual showcase format, a project was presented by the creator, then the students played or enjoyed the project, and finally, they gave a quick positive feedback comment while the next student got ready to present. We had 14 projects presented in one hour. Amazing.

Code Club Showcase project thumbnails

The final projects show a great deal of creativity and variety. It is incredible how much work went into some of these projects. I am very impressed with this group of students and grateful they all took the club seriously. I know it was not an ideal situation to learn to code in an online group but these kids were pretty motivated. They were also pretty self-sufficient and knew how to advocate for themselves to get the help they needed. They were also very patient when waiting for me to help them.

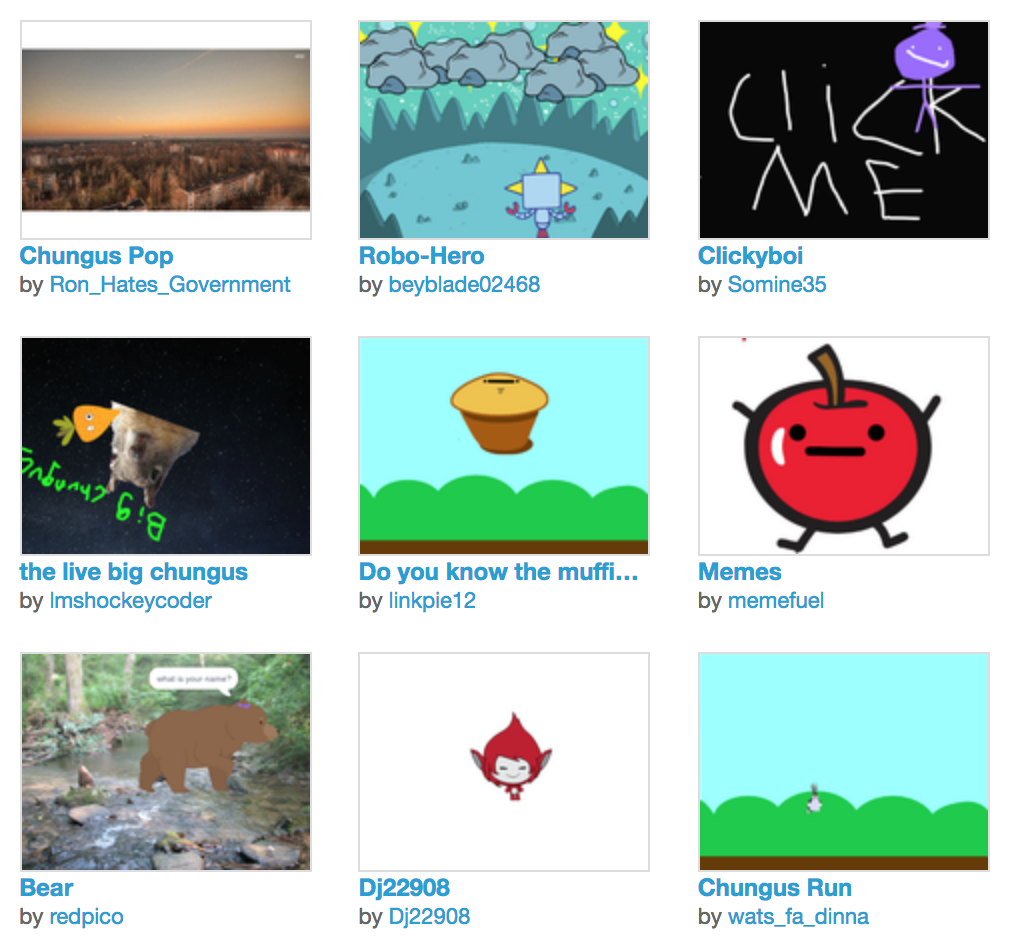
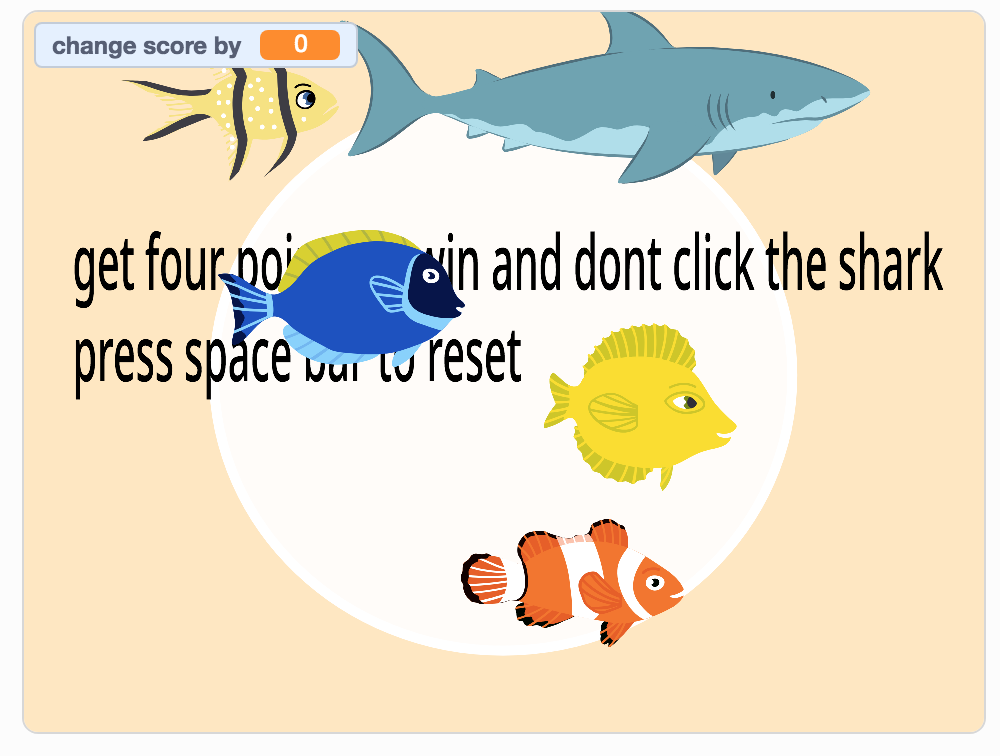
I enjoyed watching their projects progress over the weeks. Here are a few projects I am particularly impressed with: The Pipe is a maze game with a cool introduction, a couple of levels, and a secret code level.

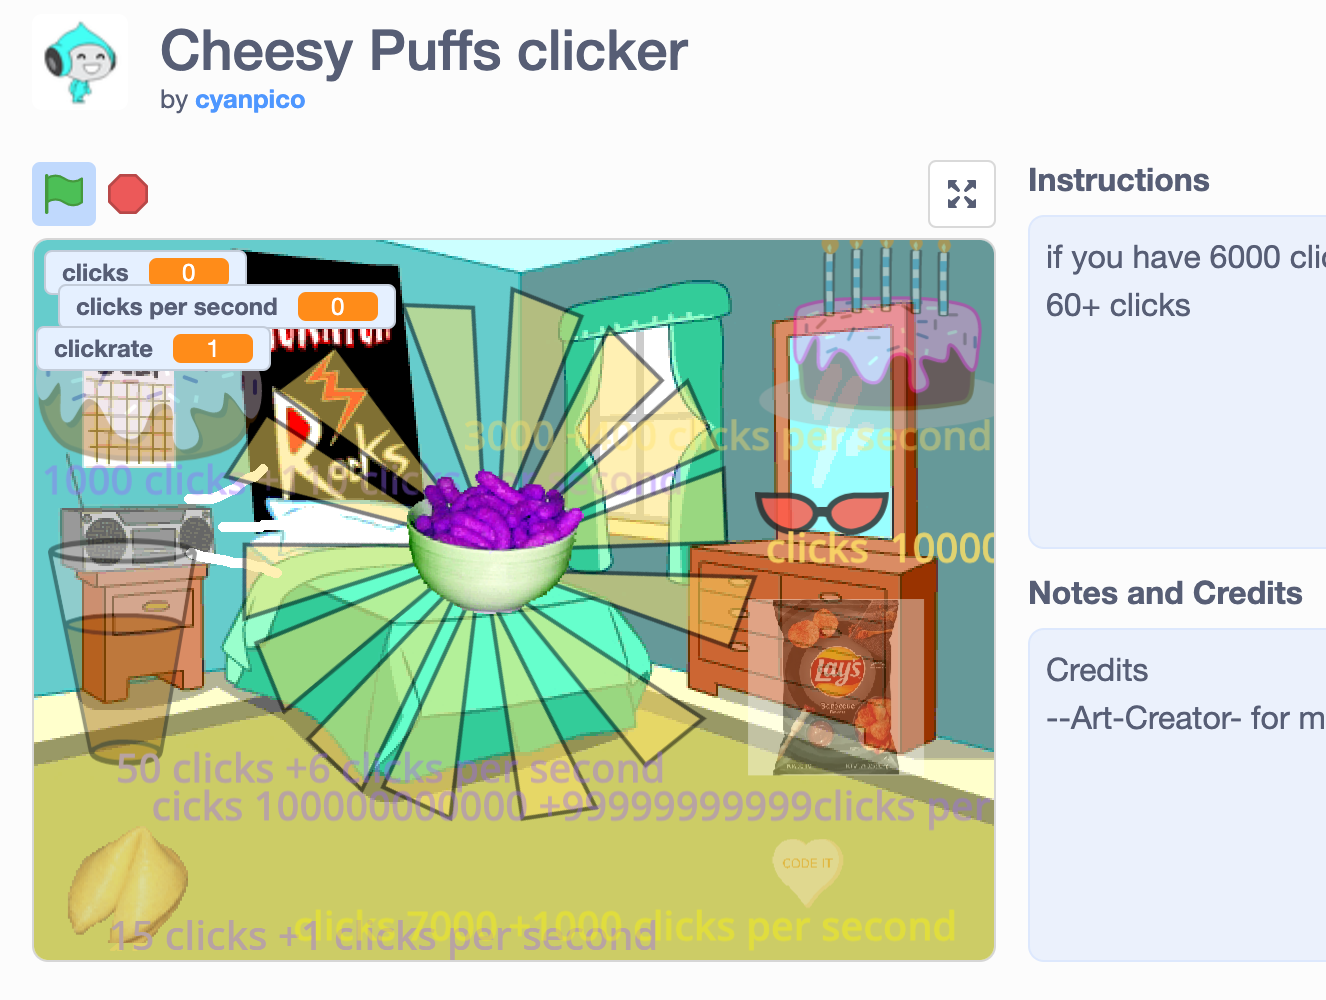
I also like Cheesy Puffs clicker: This is a clicker game with a lot of flair. I knew this coder wanted to make a clicker game so I provided some material in our classroom to support him. I think he also found other clicker games on the Scratch community to get some ideas.

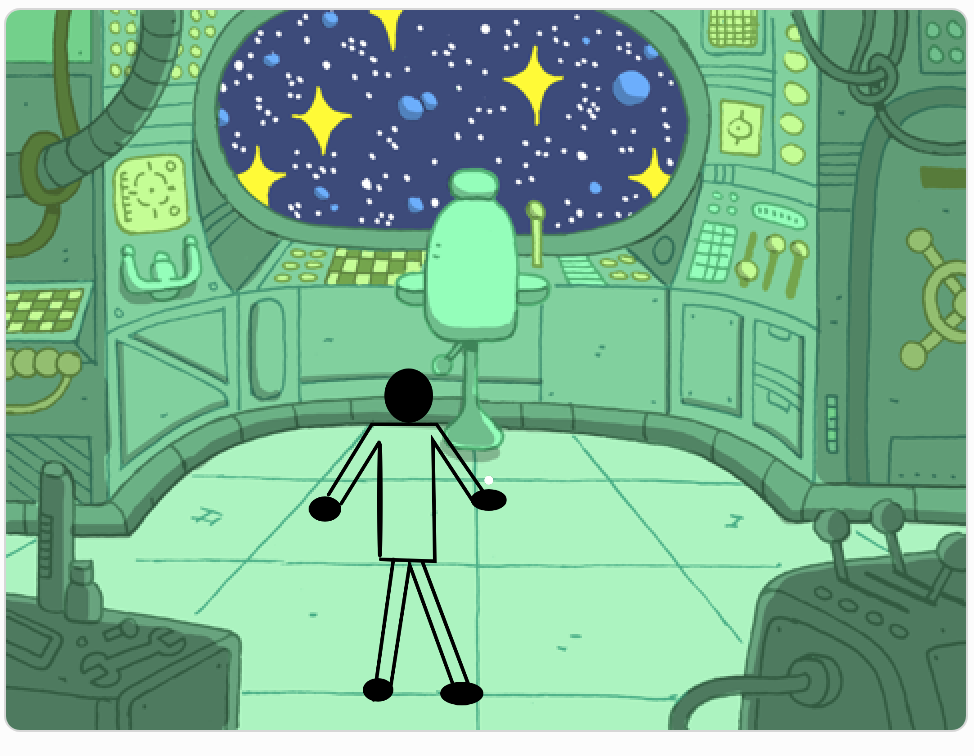
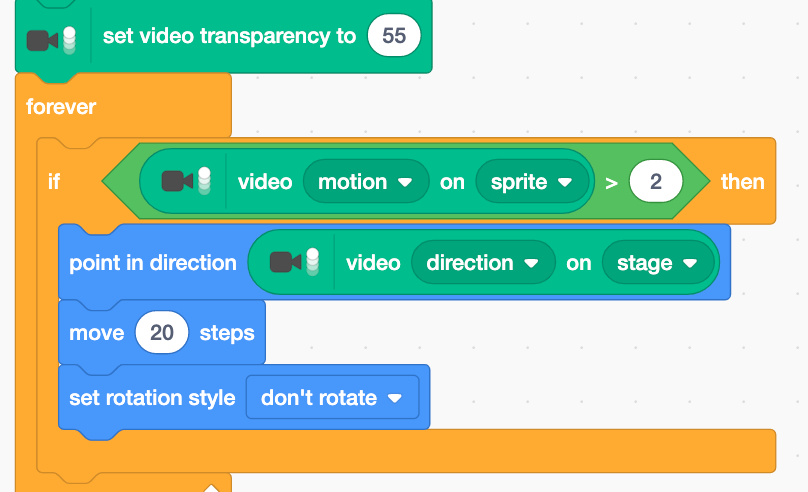
I am also really impressed by Shielder. I’m not sure how this was created but I don’t doubt that the student who created this could create this.

These next four really reflect the creativity and personality of their creators.

The quality of these projects is no different from any other showcase from other Code Clubs. It is just that this virtual code club felt like a lot of work because of the virtual nature of helping students with their coding issues remotely, but the results are gratifying. I hope they find more coding opportunities in the future.

New Approach

I tried a new approach with my intro to Scratch coding for 2nd graders this fall. I have decided I am tired of my winter scene project. These 2nd graders are using Chromebooks this year and I also didn’t want to set up 3 classes and 45 accounts in Scratch for one foray into coding. They do have some prior experience coding with Scratch Jr on iPads.

I decided on a favorite thing project where they could make their Sprites interactive with “When Clicked”. That is very much like the interactive winter scenes project but allows more creative scope. I also decided they would just save their projects to their Chromebooks. I would have them add them to a shared Drive or something and put them in a Scratch studio in my teacher account.

Thanksgiving was approaching so I framed the project as Thankful Things. I found a Seesaw activity called “Things to be Thankful For!” by Debra Locke that included a Kid President video and asked the students to respond with 5 things they were thankful for – like people, food, animals, clothes. It made the perfect project design plan. Students did a nice job with the prompt, too. (Seesaw is our K-2 LMS)

The second class time was an intro to Scratch and adding all the Sprites from our thankful plan. I allowed for some time for this. From their plan I knew some of the things they were thankful for wouldn’t be found from the Scratch Sprite library and I wanted to give them time to customize or draw their own. I mean, there is a taco Sprite but no pizza Sprite and who’s not thankful for pizza? For these 7 year olds, though, sometimes the Sprite options are too much fun and distracting to even remember what things they are thankful for. Luckily for the students, I was mostly interested in getting them using Scratch and doing some coding over following the Thankful theme.

We did add some simple “when clicked-do something” coding. We only got one or two coded and had to finish up on the third class period. Their code stacks are still very simple, but enough (especially with sounds and color changes) to make it exciting for them.

Logistically, it was tricky for the 2nd graders to load the previous project file each time – but it is tricky for them to do a number of things on their Chromebooks having only 3 months of experience with them. It did work well with prompting. They would download the Scratch project at the end of class and it would save to their device. We have one-to-one Chromebooks. Then they were able to upload the project file (.sb3) from their recent downloads when we met the following session. I was hoping they would be able to use Seesaw to upload and share the file with me, but the .sb3 file type is not something Seesaw accepts. In the end I made one account in the teachers name for each class inside my 2nd grade class and when their projects were complete, I would log in and add their project to the studio. This took more work in the moment. I had one person show the finished projects on the projector and that allowed students to see each others while giving me time to get to each student as they finished. The part that slowed me down in going to each student to help them share their project to our 2nd grade studio wasn’t the logging in but having to wait while the student thought of a title for their project.

It took more class time to do a first project this way but the results are projects that show more creative expression and individuality. They were excited to share their projects with their classmates.

Virtual Code Club revisited

Sometimes when it’s been too long since my last post it’s hard write about everything to catch up and I put off writing. Now it’s been longer so I’m going to just write and get started again.

This summer I thought my library club would be able to return to an in-person Code Club for middle school students 10-13 in the fall, but that didn’t happen and we’ve been holding our monthly meetings virtually.

In October I prepared to introduced the how to make a mouse trail video by Zoe/Zinnea, on the Scratch Team YT channel. A super fun, easy project with lots of room for creative play.

@ScratchTeam YT Channel Mouse Trail tutorial

I created a starter project in our Fall studio and also was prepared with alternative ideas including the Scratchtober SDS prompt.

Scratchtober design studio

I had one kid come to the online meeting. The same single kid that has been joining all summer long. She and I were a bit disappointed no one else joined. Coding is more fun with friends. We made the best of it and created cool mouse trail projects and hoped more kids would join in November.

In November I was really thinking if only one person comes that I should pause Code Club until we can meet in person. I prepared the Silly eyes project from Code Club. I love getting email from Code Club with new projects to try with my Creative coders! The silly eyes are separate sprites that swivel to point towards the mouse. I had seen and tried this type of animation years ago (Read a book project) but it was nice to have the step by step project directions for the students. I added RPiFoundation’s Gobo Watching as an example or remixable project to our club’s Scratch studio but didn’t have much hope anyone would show up. And….

Five kids showed up to code! Four made silly eyes projects and one tried the mouse trail project. Yay for Code Club. I guess we will keep meeting and persevere.

My Code Club’s November projects

Teaching Getting Unstuck

Last year I had the amazing opportunity to pilot the Creative Computing Lab’s Getting Unstuck curriculum with a fourth grade class. Our weekly coding sessions is what got me, the classroom teacher, and the students, through the year, honestly.

I started the class off with some introductory Scratch projects in the fall to get them familiar with Scratch online and some of the basics in preparation for starting Getting Unstuck in January. I created a class and Scratch usernames with my Scratch teacher account. The students use Chromebooks and Google Classroom so it was easy to share Scratch studio links, project instructions and GU journals whether we were remote or not.

Our starter projects for the fall were: Trick or Treat, Butterfly Gardens, and a Maze (for #CSEdWeek2020). These are some of my favorite, go to, introductory projects but they are all step-by-step, follow along projects that produce similar results. The creativity is limited and comes with boundaries. Still a great way to introduce Scratch and what you can do with it.

In January we started with the Getting Unstuck “When Clicked” module. I showed the introduction video, went over the design journal and we brainstormed about project ideas. We were going to look at the Inspiration studio next but ran out of time for that session. I met with them once a week for 30-40 minutes. It worked but modules took longer than I anticipated – mostly because the students, generally, wanted more time to work on their projects. At first it was hard to get them to share their unfinished projects in our class studio. I told them to consider them works in progress, or WIP, and that they could indicate that in the directions, notes or title. From my Scratch teacher account, I can’t look at projects unless they have shared them. Putting them in the design studio helps too.

Our first GU studio – so much creative coding!

In February we started the Getting Unstuck “Color Sensing” module. This one went better but the students had an idea of the process – how the journal works, the work flow and expectations. They had some experience sharing and reflecting. I also had a better understanding of the size and scope of projects they could create in the time I was giving them. Some of the students had such big ideas for projects and, as any coder knows, it always takes longer than expected to complete. Most of my students are novice coders but they were able to show so much expression, voice and creativity within this framework that I was happy to give them a little bit more time. I was also glad to see more reflection and more community (commenting and supporting each other) this time around.

Our third and final module was Getting Unstuck “Broadcast” module. I had planned to try the “Random” module as adding randomness to my projects is one of my favorite things, but I realized that my students weren’t ready. They were ready for broadcast and receive. One student had needed it for an earlier project. The students did a good job with this difficult concept and the GU unplugged activity really helped. The students had improved so much. They were seeing their own perseverance and growth (and writing about it in their journal) and were really enjoying giving and getting comments and especially the coding!

Commenting within a supportive community

That’s a quick overview of my experience. I also supported by the creators of the curriculum at the Creative Computing Lab and the other teachers piloting the project which was so helpful.

If you want to learn more, there’s a Getting Unstuck launch party! This party will take the form of a Twitter chat, using the #GettingUnstuck hashtag, on August 10 from 6–7pm EDT.

Code Club’s virtual future

Today may have been the last virtual library code club. The librarian and I are planning an in-person meeting for next month, outside under their tent where we will do some Makey-Makey Scratch coding. Then in the fall we will try for in-person in the library coding. It looks like we’ve made it through.

After the winter of monthly projects themed around Code Club’s protecting the planet, I changed the topic to space related projects. I found it worked better to keep one studio over a couple of months with more projects in them than have a different studio per meeting.

The virtual sessions never had more than 5 kids per meeting. Most kids came back a couple of times in a row. New students from my school code club started coming in the Spring.

My virtual library code club’s Winter studio
My virtual library code club’s Spring studio

In the Spring I was inspired by the landing of the Mars Rover Perseverance and side-kick helicopter Ingenuity that our first off-world project was to explore Mars like NASA’s Ingenuity, the first helicopter on another planet. So we tried to “Create a video game that lets players explore the Red Planet with a helicopter like the one on Mars with NASA’s Perseverance rover! Use Scratch, a visual programming language and think like NASA space-mission planners to design your game!”

We used the starter project Mars helicopter starter in our Off Planet studio. 
And the online instructions: JPL Code a Mars Helicopter Video Game.  For fun I suggested they use the text-to-voice extension blocks to have the helicopter announce Mission Success.

Ingenuity on Mars project start from JMGSTEM

Then we created a side-scrolling moon vehicle project using the project starter Moon Buggy from the Moon Hack 2019 guide. This one was difficult to complete in the time and virtually.

The last virtual session we tried using the video sensing blocks to create a space project. I put some sample video sensing projects in our Off Planet studio and suggested we test these and then change the theme to make a space version.

This seemed to work well but some of the student’s technology had trouble getting the video sensing to work. I know they all had cameras because – they were on a video call with me but maybe that maxed their device or the permissions for using the video camera in Scratch weren’t set.

Creative Video sensing space themed projects

I must remind myself that simple projects that have a lot of room for creativity work the best. It’s always about the low floor and wide walls, whether in-person or virtual.

Virtual Code Club

Last week I took my Code Club virtual as we are all trying to do in education during this time of the Covid-19 pandemic.  Here’s what I did:

I created a Google Classroom and invited all my Code Club members to join.  I created my first post, added the materials, created a short video of me introducing the concept and emailed it all out to all the parents.

Our first lesson was Virtual Pet – here is my lesson Virtual Code Club #1. I kept the format the same as our in-person meeting – Greeting, Discussion, Learning Objective, Project information. I added some links to former Code Club project examples and posted it as material in my Classroom. I didn’t want this to be an assignment with a grade or due date.  This is for fun.

Screen Shot 2020-03-24 at 3.01.22 PM

The majority of my Code Club has accepted my invitation, including my middle-school helpers. Parents emailed back and were thankful and very much appreciated the idea of Code Club continuing. I had a few student comments of “This is fun” and one student who got stuck but then figured it out before I could help him out.  It went like this:

S: I tried this and it didn’t work.

S: What should I do?

S: Oh wait, it’s working now.

Me: What a great example of debugging. Keep testing and trying options. Let me know how it goes.

S: It’s working perfectly now.

My students are young, 9-10 years old, and most of them use Scratch offline versions – like I use with them at school, so I can’t see their projects.  That is one of the toughest parts of virtual for me.  I’m not getting to see their projects.  A lot of them are learning quickly about Classroom and virtual meetings with their class through Meet or Zoom. Eventually, we may do this as well (and I can wear my Scratch cat earrings again).

Today I got an email about #ScratchAtHome from Scratch In Practice.  I will see what support they have and perhaps they’ll have some suggestions for sharing project files and other learning opportunities for my students to be creative with Scratch.

I’m working on this week’s virtual code club project: Flappy Parrot – one of my favorites.  Then I may need to figure out a way to take my Library Code Club virtual, too.

Stay safe and wash your hands.

3d Printing Club

I have wanted to run a 3d printing club for middle schoolers for a while now (since I discovered BeetleBlocks).  I specifically wanted to have a 3d printing club where we focused on jewelry making in hopes of getting MS girls interested in STEM. I have a 3d printing business and sell my 3d printed jewelry on Etsy and at the Lebanon Farmer’s Market. I see many of my students at the market and know that 3d printing jewelry might be the hook to get more girls interested in 3d printing.

Screen Shot 2019-07-17 at 9.10.43 AM

My earring design ready for sale – a shared project on BeetleBlocks

Yesterday my dream of having a 3d printing club became a reality at the Lebanon Public library and with the collaboration of two librarians. We were able to borrow two 3d printers from libraries around New Hampshire and schedule a couple of summer sessions.  We met a week prior to the first session, when we had the printers, to make sure we could run them and change the filaments, etc.  We have an Ultimaker 2 Go and a MakerBot Replicator.  This is a bit complicated as they take different size filaments and use different programs to prepare the models.  We have some jewelry findings and different color filaments – silver, gold, bronze in 1.75 mm for the MakerBot and blue in 3 mm for the Ultimaker.

We were hoping to get 3 printers and have 3 students per printer for a group of 9, but only 5 had signed up so we opted to go with just 2 printers as the third was at a library on the other side of the state.  When I got there on Monday, there were 9 students.  The librarians had decided to let the drop-in students stay and I was fine with that.

Screen Shot 2019-07-17 at 9.14.52 AM

My notes for my intro to the 3d design & printing process.

After a brief introduction where I wanted to make sure that they understood 3d printing was an iterative process not unlike the engineering design process, I showed them a jar full of bad prints from my jewelry printing business.  Then we got started.

Screen Shot 2019-07-17 at 9.09.47 AM

For the first of the two sessions, I introduced BeetleBlocks and we created simple rings by measuring and using a tube shape (Here’s my video tutorial). In just three lines of code, the rings were created and we were able to have them export and save to a flash drive/sd card.  We loaded half onto one printer and half onto the other and started printing them. Rings take about 5-9 minutes each.  The goal was to have something to take home by the end of the session. Then during the week they could drop in and print another, bigger, individual print like a pendant or a pair of earrings, etc.. The librarians had a list of times when they would be available during the week to help the students print another ring or a pendant.  I thought this would alleviate the problem of having enough class time to get everything printed.

I created a second video tutorial on how to code a pendant or earring from a squiggle. There wasn’t time to go over the whole tutorial during the session and anyway students were busy exploring BeetleBlocks: adding their names to the rings, looking at community projects, playing with extrusions and other shapes. While some just wanted to watch the printers for a while.

Screen Shot 2019-07-17 at 9.09.02 AM

Extrusion pendant by a middle school coder

Next week we are going to explore TinkerCAD as another application that I know that makes it easy to create 3d designs.

Music and Art Projects

My 11th 4th-grade Code Club Showcase is coming up this week. Eleven of 13 projects are ready to go. The last two are showing good progress, so I’m not too worried. I’m seeing the usual variety of virtual pets, flappy bird, pong, quizzes, soccer, chatbot projects, etc. (and yay, no “try not to laugh” games). This current group of projects represents a lot of creativity and effort and we are going to have a great Showcase. There are also two unusual projects that I haven’t seen before.  One is a music quiz and the other a color-by-number game.

The music quiz is very creative and I love it.  This student created his own music and asks the user to identify his songs by name. You can practice by listening to the music he has created before you take the quiz.

Screen Shot 2019-05-13 at 9.47.00 PM

Click the buttons to preview the music before taking the quiz.

I imagined he would code the music with the Scratch music blocks, or want to bootleg popular songs.  Instead, he used Chrome Music Lab’s Song Maker to write his own songs.  I had been experimenting with Chrome Music Lab earlier this year and was excited to see that this was his app of choice to create music.

Screen Shot 2019-05-13 at 9.50.48 PM

Chrome Music Lab’s Song Maker example

The biggest problem we ran into was there is no way to save or record directly from Song Maker. I researched some other ways to record sounds from a website but the simplest we found was to plug in our microphone, start recording in Scratch and then hit the playback button from Song Maker. We made a few poor recordings from the low-quality computer speakers and noisy room and I wasn’t sure he was going to be happy with the results or that it would even be enjoyable to listen to and take his quiz.

Screen Shot 2019-05-12 at 8.25.44 AM

Mr. Songs Alot project

For the final song recording, I let him record in the quieter room adjacent to the computer lab.  It turned out pretty well.  He even gave it a cool name: Mr. Songs Alot.  I hope he gets some good feedback and more students decide to try a game like this.

The other unique project was the Color-by-Number project. I’ve had students create a painting game with the Paint Box project, but not a paint-by-number type project.  I let them work on it a while but it became clear they had no idea how to code it to make the paint appear. So I went looking and I found an example of a paint-by-number project on Scratch that they could examine and learn how someone else coded it.  This is a great way to learn new techniques and algorithms in computer programming.  Software writers are great at this-trying to solve their own problems by looking at someone else’s examples- it is kind of why/how Stack Overflow came to exist.

Screen Shot 2019-05-13 at 7.31.35 PM

Paint by number project

Even after they looked at it, I don’t think they understood that they had to create themselves the illusion using different Sprite costumes to make the color fill in (or they just forgot from one week to the next).

Screen Shot 2019-05-14 at 6.53.06 PM

The “magic” of the paint by number is 2 different costumes for the coloring illusion.

The example had 2 costumes for each different color. One with color and one with the number in it.  When you dragged the paint bucket over the Sprite and clicked, the Sprite went from the number on it to the colored one and the paint bucket goes from filled to empty.    One team member was making the “coloring page” and the other coding the paint buckets. The “coloring page” maker kept making the pages on the Stage while I kept reminding them about the example I gave them.

I worked with the paint bucket coder and we tweaked some of his code so that it is a good project even if it is only one picture to color.

We had some issues with paint buckets when they start on top of the Sprite they were going to color and instantly coloring them in when the green flag is clicked. Also, keeping the “coloring page” Sprites on the visual layer under the buckets was tricky.  I couldn’t find the Scratch 2.0 option to make a Sprite not draggable by the user.  I might have to explore this type of project to see if I can make it into a learning project for one of my groups.

The showcase is tomorrow!!!

Update:  I found out that Song Maker has added a save feature so we can now download a wav file and import into Scratch. This is great.

LMS Winter Carnival

Last week I ran two coding sessions at the middle school for their Winter Carnival.  There are a wide variety of activities offered for the 5th- to 8th-grade students during the morning, divided into two 1.5 hours sessions. Options ranged from skiing, dancing, and ping-pong, to cookie decorating, tic-tac-toe, and D&D.  I was invited to offer Scratch coding.

My activity, Coding/Scratch, had this description: “Students will have the option to create a game, animation or pursue a passion project of their choice using Scratch 3.0 coding environment.”

Despite the unlimited options in the description, I wanted to offer some project guidance as I didn’t know the coding experience of those who would sign up. I decided on three projects from Code Club World that in my experience offer students the greatest creative choice coupled with step-by-step instructions.  The first option was Chatbot.  I’ve discussed how much I like this project before and with the added text-to-speech options in Scratch 3.0, I knew this would be a hit. The second option was a “clicker game” presented with Code Club World’s Ghostbusters project.  The third project was the “side-scrolling platform game” Flappy Parrot from Code Club World.  I feel any of these three projects can be accomplished in 1.5-hours with this age group.

In preparation, I went through and created starter versions of these projects. I also set up a Scratch studio for everyone to share their projects. Once the students were logged into Scratch (some had to make their own, new accounts), I invited them to be curators so they could add their projects to our group studio. This part required a bit of administrative time but it is not difficult and works well for everyone to have a single place to go to play each other’s projects. I feel it is important to carve out time to share and showcase what everyone has accomplished, knowing that we all had a limited amount of time and that the projects aren’t perfect or even finished.

About ten students signed up for each session but only one girl in each session.  One of the math teachers joined me- she is eager to learn Scratch and we work well together.  I knew more than half of the students and some of them were with me in past Code Clubs. I think the students had a good time. I definitely feel like we supported their ideas and creativity. I’d love to get feedback from them. I shared the project studio with the school administrators and they thanked me for participating.

Screen Shot 2019-02-22 at 3.13.51 PM

Chungus Run – a creative Flappy Parrot game – good instructions, too 

Some notes from the sessions:

  • Time management is key with short sessions – I posted our schedule – Intro 10min/ Plan 10min/ Code 55min/ Share 15min
  • The project guides were helpful even if only to get them started before they went off on coding tangents.
  • These students showed creative, flexible thinking. Scratch supported their creativity by making coding flexible to their ideas.
  • It is difficult to share something you know is incomplete.  I announced a time check at 15 minutes before we wanted to share, so no one was caught unaware.

Screen Shot 2019-02-22 at 3.17.30 PM

Fishie Click game – former 4th grade Code Club member

Coding projects are like art – they are never really “finished” or “perfect”.  They are “done” when you decide to stop working on them. – I said this to someone who was bemoaning the end of the coding time and another student laughed.  She clarified that she was an artist and understood that fact very well.

Screen Shot 2019-02-22 at 3.16.38 PM

The Majestic Bird – Well done and so annoying!


New Year, New Scratch

Creative Coders Club on Monday was one of our best sessions ever.  The kids were really creative and funny and fun to work with.  The kids that came were all returnees and familiar with Scratch.  It was their first time working with Scratch 3.0 and despite a few grumblings about where familiar tools went, they were able to create some creative projects.  For such young people, they really seem upset about the changes to their coding environment.  I’m sure they will get used to the new version and not look back.

When I was looking for a project this month I noticed the tutorial from Cartoon Network on Animating an Adventure Game.  I knew the Creative Coders had been wanting to make an adventure-type game.  I added this option to our January studio and went through the tutorial myself so I could field any issues.  It has some fun character Sprites but turns out to be a simple “collect the gems” game. I felt it was a nice option for the club.

I also looked at the Scratch Design Studio for January.  I’ve been looking at the prompts each month since the Scratch Conference in August, hoping to find one that would work for this club.  The current theme is the Year 3000.  I felt it would really bring out their imagination and creativity.

I started out our meeting with a “Happy New Year” and a question for them. Did things seem different now that it was 2019 or did things just seem the same?  I told them that when I was their age, computers weren’t for kids and that 500 years ago books weren’t for kids either.  Then we brainstormed about what the year 3000 would be like.  That was the first hook.

Then I read them the Scratch Design Studio description.  I really liked some of the questions it asks, like what will food be? like or how will we dance?  It sparks the imagination. They shared their ideas and I had a difficult time getting them to not share all at once.

Next, I showed them the project I made about the year 3000.

screen shot 2019-01-08 at 9.18.15 pm

My sample Year 3000 project

The other hook was the text-to-speech extension in Scratch 3.0.  screen shot 2019-01-08 at 9.29.24 pm
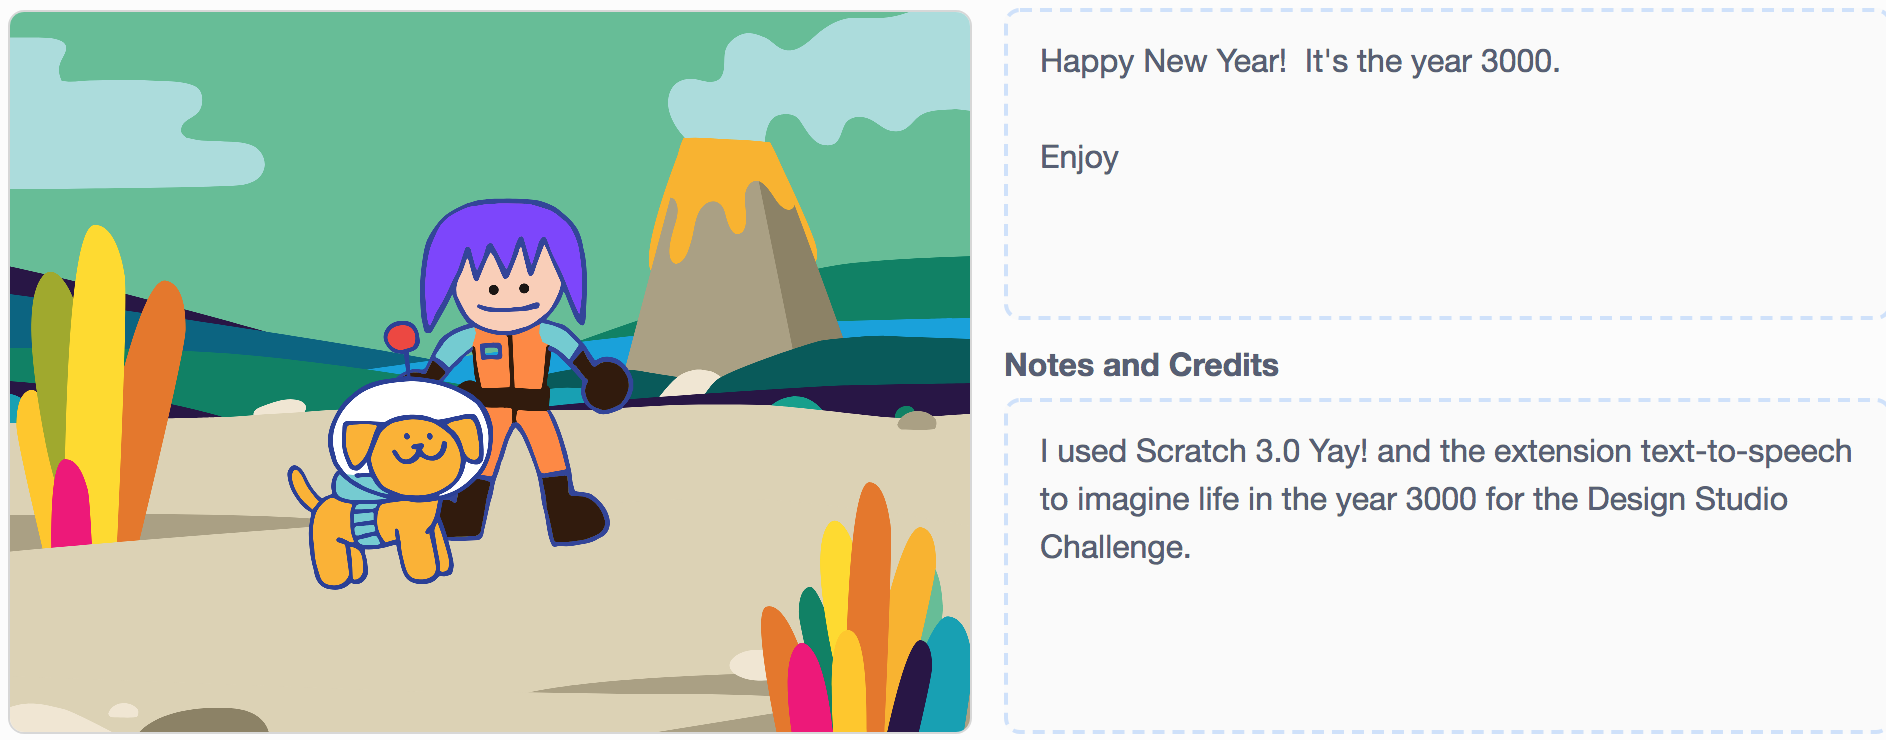
I had read that some of the tools from Scratch 2.0 – like music and pen blocks – had been moved into the extensions section.  When I went looking, I found the text-to-speech extension.  It is easy to implement and works great.


I knew it would be a hit with the Creative Coders, and I was right.  (My only worry would be about the appropriateness of the middle school students – and I let them know, a few times, what my expectations were).

Everyone incorporated text-to-speech in their project and everyone used it appropriately. Whew.

There is not much time in an hour to imagine and create a project but the kids managed to work hard and when I told them they had only 10 minutes to get something ready to share, a few of them revised their big ideas into something manageable.  Two (of ten) said they would finish later.

In the last ten minutes, I showcased the projects they made and added to our January 2019 studio.  We laughed and enjoyed each other’s creativity and imagination.

screen shot 2019-01-08 at 9.43.33 pm

The very funny “So boring” Year 3000.

screen shot 2019-01-08 at 9.47.53 pm

Another very funny text-to-speech Year 3000 project.

I highly recommend trying out the text-to-speech extension blocks and the different voices.  It is a little tricky to have the “text-to-speech” and “say” blocks sync up (like closed-captioning) but is worth it to be able to see and hear the project.

I hope some of them submit their projects to the Scratch Design Studio and I hope next months SDS theme is just as fun.

Happy New Year and kudos to the Scratch team for a great new version!