Health-o-meter Sprite and Stamping

Last week I introduced my Health-o-meter sprite to the students.  It’s based on the Health Meter sprite Colleen Lewis, the professor of the Scratch Programming MOOC on edX, shared in the class.  I noticed a couple of students adding the sprite to their project or making their own version.  It will be interesting to see it in action.

Health-o-meter script and costumes

Health-o-meter script and costumes

In general, Code Club went well again last week.  Students are making progress on their individual projects and the number of issues that crop up are not overwhelming.

Although one student’s query had Alex, my high school volunteer, and I stumped.  The student is making a paint program similar to Paint Box, a Code Club World project we worked on earlier in the term.  She has taken the basic project and is adding more colors and features to it.  One addition she is working on is a stamp tool.  She has drawn a few sprites: rainbow, present, balloon, lightning and wants the user to be able to place copies of the stamp on their drawing. Scratch 1.4 has a stamp block in the Pen menu but she was having trouble getting it to work.  Alex and I both looked for help on Scratch Wiki, but were not successful in getting any code to work in the moment.

I spent some time today researching and testing some code and I think I have a couple of different algorithms for her to try tomorrow.  I did find a good resource through the Scratch Wiki – a Stamping tutorial and explanation, which helped get me started.

One way to work the stamp tool would be to have the sprite “stamp” itself in a random location on the stage.  Here I have a ball sprite and when the sprite is clicked, a copy of the sprite will appear on the stage in a random position.

stamp tool, version 1 -random placement

stamp tool, version 1 -random placement

That’s okay, but I’m sure the “painter” would like to pick the place where the stamp will go.  So I worked again to improve my solution.  Here the ball sprite moves with the mouse when clicked.  When the painter presses the “s” key, it makes a stamp of itself and the sprite returns to its original position on the toolbar.

Screen Shot 2015-03-24 at 7.49.02 PM

Stamp tool, version 2 – click and press “s”

That is better.  Now, though, I have to instruct the “painter” to press the “s” key to stamp. So I took one more try at the code.

Stamp tool, version 3 - on click

Stamp tool, version 3 – on click

This seems to work in my simple case, but I know in her paint program a lot of drawing happens with mouse down, for example, the pencil goes to the mouse-pointer. She will have to try it and test it.

Screen Shot 2015-03-24 at 7.58.06 PM

Something else could go in the repeat until – like the sprite could say “click to place”.  As always with code – different algorithms can give similar results.  One way may more pleasing to the coder than another.

I can’t believe there is only two more weeks of Code Club.  Students will need to finish up tomorrow and we all need to prepare for Showcase #2.

Scratch Work in Progress

Watching 4th graders make their own Scratch games is a blast. My two high school volunteers and I have a lot of fun troubleshooting coding quandaries and generally watching students’ “ah-ha” moments when discovering ways to code their ideas.  They love to show you what they’ve built so far and tell you what’s coming up next.

Last week I used quietAnnie1’s idea to start an Expert list on the board.  Students who wanted to volunteer their Scratch expertise to help other students could put their name on the list.  If other students needed help, they could first ask an expert before putting their name under the Please Help list. This did keep the Please Help list short.

I brought out the microphone for a student and later saw another student had started a Microphone list.  I love that kind of initiative.  (A note about microphones and students:  If you think 20 kids programming together in an after school setting is noisy, just throw a microphone in the mix. It will not help.  Generally Code Club has a productive noisy buzz, but I did have to ask for quieter voices a time or two last week.)

Some interesting games are under development and some good progress has been made.  I’m optimistic that our 2nd showcase will not be as stressful or chaotic as the first.  Time will tell.

Here are a couple of progressing games by new Scratchers:

Screen Shot 2015-03-17 at 10.02.21 PM

Beat this, if you dare

Screen Shot 2015-03-17 at 10.00.01 PM

Maze game

I also had time this week to complete my final project for the “Programming in Scratch” MOOC on EdX by HarveyMuddX. It is a simple adventure game.  It needs some final kid testing, but I’m satisfied with it: Princess Project

Princess Project adventure game

Princess Project adventure game

My Own “Programming in Scratch” Challenge

Last week was Design Review Day for my code club. In one week’s time the students were able to come up with an original idea for a game, design it, plan its creation and pitch it.  Amazing!  This time I manned the lab while Alex, my high school volunteer and a parent volunteer conferenced with each group.  Both volunteers were pleased with the pitches in general. I admit that I haven’t had a chance to review any of the completed game design documents myself.

Instead I’ve been busy working through a Scratch language MOOC on edX, from my alma mater, called: HarveyMuddX: CS002x Programming in Scratch. I’ve been excited about taking this online class since I first learned of it and started following the course professor Colleen Lewis on Twitter and at CSTeachingTips.org. The course has a nice balance of video lecture, directed “play” in Scratch and rigorous quizzes. The class has helped fill in gaps in my knowledge of Scratch. For one thing, I hadn’t played around much with the Sound blocks in Scratch, so that was a fun week.

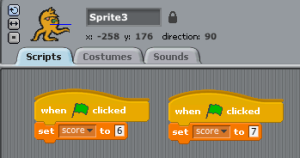
I also learned about race conditions, which I hadn’t heard of before.  A race condition is where two things are competing to set a variable or perform two operations at the same time and you cannot be sure of what the outcome will be.  For example, below I’ve set the score to two different values when the green flag is clicked.  Which will Scratch choose?  -whichever setting wins the race.

race condition

An example of a race condition

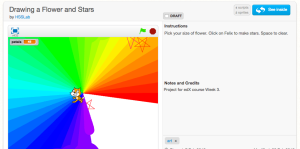
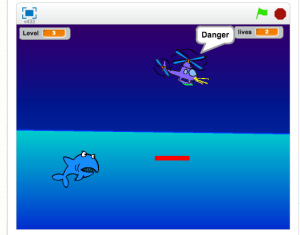
I had fun making some little drawing projectsScreen Shot 2015-03-10 at 8.27.51 PM and a helicopter game.

Screen Shot 2015-03-10 at 8.16.57 PMNow I have to design a final project. And I have been directed to think about it first…

Rather than just diving into a project, we want you to start thinking about different ideas for things what you might do.

Hmm.. that’s like what I asked my students to do.  The tables have turned and I’m not sure how they did it, now.  I’ve been toying with a couple of different ideas for awhile now and I’m still not sure what I want to tackle.  I’m going to have to make a decision soon and get to work.

This is my favorite question in the final project design phase of this MOOC:

Think about breaking your project into a series of simpler steps. What are the FIRST three things that you would make work?

I wish I had put some wording like that in my game design document for my students.  At any rate, I will remember to ask my students how they will break up their tasks as they continue work on their projects tomorrow.

Game Design Challenge Accepted

Last week in Code Club students began the design phase of their individual Scratch project. I planned the session to go the same as Key Steps in Game Design did: guest speaker, game design document, short Scratch project. Things didn’t go quite the way I planned…

Guest Speaker: We had the same parent volunteer come and give the same talk about planning & time management. I was worried the ones who had heard it before wouldn’t pay attention, but each returning Code Club member has experienced the pain of running out of time and dealing with unfinished, buggy projects. So they listened.

Screen Shot 2015-03-02 at 10.05.46 PM

Screen Shot 2015-03-02 at 10.07.03 PM

Game Design Document:  GDD Spring2015 This is the document where the students write out the plans and goals for their project, draw out their ideas for Sprites & Stages, define game flow & control elements, and set a schedule for achieving their goal.

gameplay

Game goals defined in the GDD

technical

Example of the Sprite and Stage design from the GDD of a new coder

Scratch Project: When I had finished going over the GDD, instead of wanting to work on a Code Club project, they all started to work on their game design and got down to planning. No one was interested in a project handout.  They had their own project to think about and that could not wait.  I was most impressed.

It is helpful, for me and the coders, to have been through this process once before. What made the difference, I think, from last time, is that this time I had examples of how a GDD turns into a completed project. I showed them a couple of different GDDs from the Fall -actual student work-  and then brought up the game it turned into from our Showcase#1 -more actual student work.

One student finished the GDD, with a bit of help from me, and had time to start working on the Sprites. Already!

Screen Shot 2015-03-02 at 10.31.13 PM

Sprite designs for new project

Two separate groups of three asked if they could work together.  My rule is these are individual or pair projects.  I turned one group down because I know them and one student would be doing all the work while the other two would have all the ideas. I have given a qualified ‘okay’ to the other trio on the condition that the jobs of each member are specified in the game document and divided evenly. I know them as well, and they might be able to manage. It is always interesting to watch team dynamics with students.  Another duo started out together but by the end of the hour had already decided to work independently.  Best to figure that out in the beginning.

By the end of Code Club I had a few finished GDDs ready for the design review this week. Some look pretty interesting and of reasonable scope. I’m not as nervous about their projects as last time.  The students have had less time to plan, but I’ve seen some of the planning they’ve done and I know what they are capable of.  I can’t wait to see what they’ve come up with!