Fractions to Decimals

I created a Scratch lesson for my 7th grade math class this week. It is a starter project but I wanted the students to have a bit of practice with Scratch before we do a more complex math modeling project in November.

(First a bit of background – I’m student teaching middle school this fall and should have a 5-8 Math teacher certificate by the end of the year.  I’ll be back at my elementary computer lab position after that and I’ll run my code clubs in the winter.  I’m still leading Creative Coders Club at the local public library once a month.)
Screen Shot 2018-10-14 at 7.06.42 PM

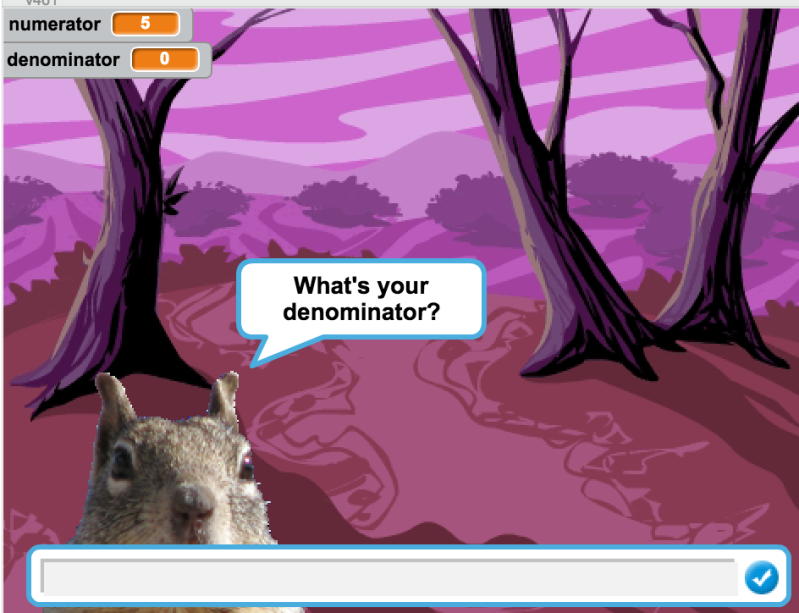
The 7th graders have been learning about expressions with variables, integers and rational numbers. For this introductory project I had them create a fraction to decimal converter. Have the user give two integers and use division to give back the decimal.
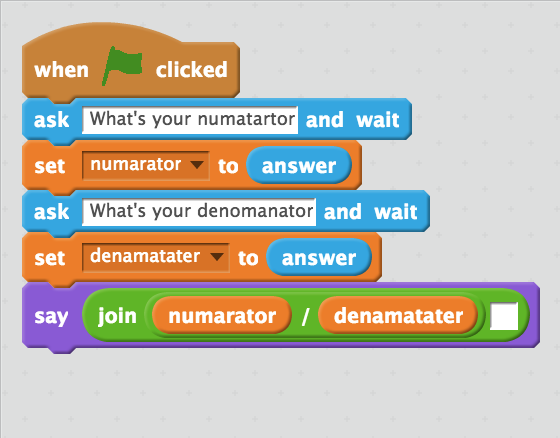
Screen Shot 2018-10-14 at 7.04.17 PM

Basic code for project (with spelling errors).

I set up a Scratch teacher account with classes for the each section of 7th grade math then put the class invites into our Google Classroom.  This worked well since we were using Chromebooks.  I’m not sure how students who already have a Scratch account would be able to join our Scratch class, but the students seemed okay with making accounts.  I gave a few suggestions on setting up account names.  The only hiccup we had was when they went back to log in a second time, many went through the class invitation again and then couldn’t log in without setting up a second account. (I hope there is a way to remove those extra accounts.)  Adding a direct link to Scratch in our Google Classroom and giving clearer instructions alleviated this problem.

I set up a studio for each class but I gave them the exact same name.  This confused me later when adding projects to the studio I couldn’t tell which went with which class. Luckily you can easily change studio names.

Rational Number Period 1

Rational Number Period 4

After the first day of working on the project, I decided that I needed more formal assessment of this project so I adapted a rubric from the Scratch Ed one here and set up some test cases for the students to use to test their projects.  Testing is an important part of programming.

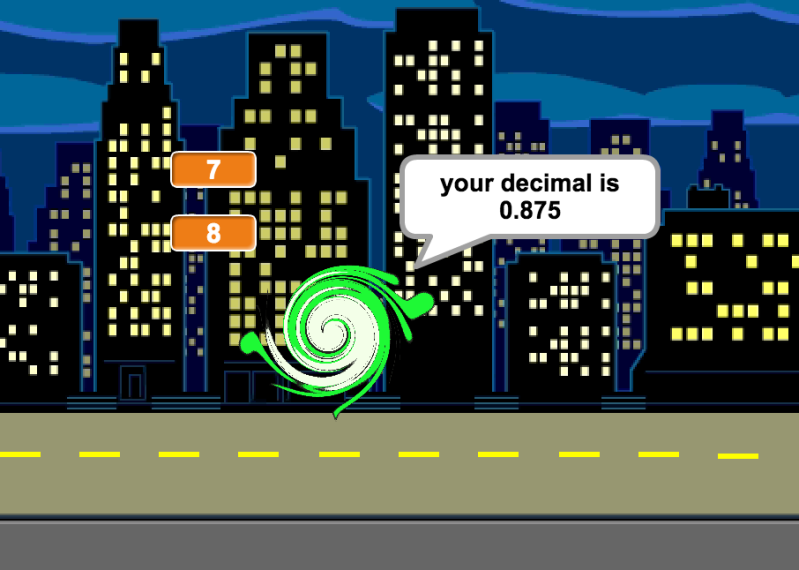
Students seems engaged and excited to be working in Scratch. I’m pleased with the turnout of completed projects and quality of the work.  There are some missing instructions and spelling issues but even I spelled denominator wrong in my example and a student had to point this out to me. A number of students came in during study hall to work on their projects.  One student who was new to Scratch and our school just had the biggest smile when he learned about the color and whirl effect options.
Screen Shot 2018-10-14 at 7.06.07 PM

New coder excited about Scratch

And one of our struggling students went above and beyond with her project.

Screen Shot 2018-10-14 at 7.05.16 PM

Excellent project

One issue I inadvertently avoided was the fact that Scratch will round decimals to two places in say blocks unless they are inside join blocks.  The Scratch Wiki mention of the Offline Decimal Trick  is the only reference I found in support of this feature.  Fortunately my directions were for student to use the join block to join “The answer is ” and the answer.  This allowed the students to see all of the interesting repeating decimals and weird rounding that appears from converting rational numbers into decimals. I didn’t notice this happenstance until I was helping some students finish at the last minute and we took a short cut for the last line and just put the answer in a say block. It took me a while to figure out what was going on.

Screen Shot 2018-10-14 at 7.03.23 PM

Without the join block, decimals are rounded to 2 places.

Here is the lesson I designed: Decimal Scratch Project If your students are really new to Scratch it might be advantageous to print the first page in color so the students can see where to find the blocks. (I guess I’ll have to update this when 3.0 is released.)

I wondered if any student would try to divide by zero.   Scratch will return the answer “Infinity” in this case which could lead to an interesting math discussion.

BeetleBlocks Tower

My math students are coding a tower in BeetleBlocks.  This is a project that I have wanted to do since a 4th grader last year designed a tower in BeetleBlocks. He called it the Sears Tower.

Sears Tower

4th grader designed  Sears Tower

I set up the engineering project with the following constraints:

Engineering Task: Use the Shapes menu blocks cube and cuboid to build a tower.

Constraints: 1) You must use at least 5 Shapes blocks. 2) Each shape must stack on top and be smaller than the shape below (no overhanging blocks) 3) The total height must be 100 mm or less (but greater than 80mm) 4) the base must be 35mm x 35mm

When I introduced the project I said we would use the Engineering Design Process  (Ask, Imagine, Plan, Create, Improve).  I explained the constraints and let them ask questions. They would need a written plan of their design with a bit of pseudocode* before I would let them on the computers.

(*I used the word pseudocode and one student thought I said Sudoku.)

Drawing from the Center

Next, I explained a bit about how the beetle draws the shapes from the center.  This is the big concept for this project.  They would calculate the center height, move the beetle, draw the cuboid, move to the center of the next cuboid, etc.   I modeled an example of a plan and pseudocode on graph paper:

OLYMPUS DIGITAL CAMERA

Pseudocode on the left, block tower start on the right, z height line in the middle.

One thing I learned was drawing the model in 3d wasn’t necessary, in fact, it was probably confusing.   The students’ models were easier for all of us to understand if they drew them in 2d and just concentrated on z height and moving the beetle to the center of the next cuboid.

We spent the rest of the class period working on their plans. One student was going to use a repeat block and make a tower of all the same blocks, so I had to change the constraints to specify 5 *different* cuboids.  A number of students were stuck on the calculations from the center.  I suggested they move to the center, draw, move to the top, move to the next center, draw, etc, breaking the problem up into smaller parts.

The next time we met I reviewed BeetleBlocks coding and suggested they use Wireframe to see inside and the beetle at the center of their block.  BeetleBlocks also displays Position (the 3-d coordinates) of the beetle, so they know the z-height.

Screen Shot 2018-05-28 at 9.36.18 AM

Partially coded tower and wireframe displaying beetle at the center of the upper cuboid.

If they were happy with their paper plan they could go right to BeetleBlocks. About half the class finished their coding by the end of the class and I’m busy printing towers on our little Printrbot Play.  Another thing to note is that the minimum size of the cuboids should be 3 mm for ease of printing.

A few of them will need improving before theirs will be printed.  I noticed a few cases where the blocks were nested not stacked on top of each other.  This tells me the student is not coding z-height correctly, which is the concept I am trying to teach, beyond calculating centers of cuboids.

Screen Shot 2018-05-28 at 9.47.36 AM

Nested blocks showing me the student hasn’t coded z-height correctly.

Set versus Move (Change)

There are two different ways to code the beetle to change z height.  One way to set the beetle to a specific z coordinate and the other is to move or change z by a certain amount.  These are two different perspectives to use and I let them choose which way makes more sense to them.  Set versus change statements can be confusing when programming and cause unexpected results.  Here we can look at the model using the wireframe setting and see what is happening.

One student is making a pyramid of blocks, each block 1 mm smaller (width, length) and 2 mm in height than the previous.  He is hard coding each block.  I’m going to suggest he use a repeat block and a variable.

Screen Shot 2018-05-28 at 9.53.41 AM

Code suggestions on the left for the pyramid making tower code on the right.

This project is turning out well and I’m learning a lot along with the students. I can print each one in less than 2 hours by setting the infill to 10% and cranking up the speed.

I’m surprised no one has created a double tower or thought to rotate on the z-axis to give the tower a bit of twist.  Dare I suggest these things?

Trick or Treat

Today was the second Scratch session with a 3rd grade math class and it was a blast.  Last week I introduced Scratch to them and they also tried out the Etch-a-sketch project from Simon Haughton’s Scratch Progamming lessons.   Some of them spent some time during the week playing with Scratch during free time in math class.

This week I wanted to introduce the “ask and answer” blocks and “if-then-else” so I came up with this Trick or Treat lesson, just in time for Halloween.

First I verbally asked them “Trick or Treat?” Most of them said, “treat” of course.  Then we brainstormed what a “treat” would look like in Scratch – do something (animation), change the costume, say something, play a sound.  They of course had big ideas like candy falling from the sky or the Sprite eating a pile of candy.  I tried to translate that into more programable language.  Then we brainstormed what a “trick” would look like.

I showed them my sample project where a ghost asks “Trick or Treat” and if you say “treat” he turns into a bowl of cheesepuffs otherwise he turns into a scary ghost.  I also had different sounds and a bit of animation (the Sprite turns and grows).

Next it was their turn. I directed them to picked a background for the stage and a Sprite.  Their choice.  We had a lot of ghost and ghouls, but quite a variety of backgrounds.

Screen Shot 2015-10-27 at 9.25.50 PM

Then they asked the question “Trick or Treat?” and set up the answer to equal trick or treat.  Also their choice.Screen Shot 2015-10-27 at 9.28.58 PM

We tested it and they noted it didn’t do anything. Well, not yet.  So we added a “say” block for each condition depending on if what they were looking for, trick or treat, and the opposite in the else clause.

Then I had them add two sounds, one for each condition.  In hindsight, I should have saved the sounds for last as noise level went up both from excitement and the random sounds playing in the room.

Screen Shot 2015-10-27 at 9.08.07 PM

Finally we added some costumes to the Sprite, one for each condition.  (There was a bit of confusion here because we weren’t adding more Sprites but costumes to our Sprite.)

Screen Shot 2015-10-27 at 9.41.58 PM

That was it, with just enough time to share their work. Their math teacher suggested this and it turned out to be a great idea. The projects were saved in a shared directory and all the laptops were closed and I displayed each project up on the screen for all to enjoy.  When it was their turn, I asked the project creator if they wanted me to answer “trick” or “treat” first, then played both cases for all their classmates to see. Screen Shot 2015-10-27 at 9.21.32 PM

I’m very pleased with how this project went with this group of 3rd graders.  I would definitely do it again- just have them add sound last.

Like a Dream

I taught so many hours of code yesterday that I dreamed in code.  (It was the only way to move in my dream.  Thanks Anna & Elsa.)

Code.org puzzle with Frozen characters

Code.org puzzle with Frozen characters

But it was an awesome day.  Three classes of Hour of Code 2014 activities from Code.org, Tynker, & Code Kingdoms for 2nd and 4th graders plus two classes of Scratch and then Code Club after school.  A few 4th graders were with me for couple of these hours, too. I wonder if they dreamed about coding too?

For Computer Science Education Week, or “Hour of Code” week, I had the 4th grade math group I work with write math games in Scratch.  The project idea comes from the Scratch resources on Computers for Creativity‘s website.  The students were paired up and given two math periods to work on the project.   I showed them the two math games that students had made last year:

4th grade math quiz game in Scratch, 2013

4th grade math quiz game in Scratch, 2013

Screen Shot 2014-12-11 at 8.28.20 PM

4th grade math quiz game in Scratch, 2013

I handed out a one page project outline form and a print out of the guidelines to each pair.

Math Scratch Project Outline – Google Docs

With not very much time to work on it, I warned them to keep the project simple.  Get the game working with one math question, then build on it. I also made sure there was a Code Club member in each pairing, so at least one person had some knowledge of Scratch. I then I let them go.

I set their teacher up on Scratch online and he started a math game himself.  That was Monday.  Yesterday my plan was to have them finish up. My friend and co-worker in this class suggested they might need more time.  She had gone home and tried to make a Scratch math game and had some questions.  (How cool it that?  I’ll have to give both adults their “Hour of Code” certificate.)  But it is true,  I did give the students a big, creative project and only a little bit of time to do it.  From what I saw on Monday, only a couple of pairs were making their game too complicated and or not working well together.  We decided to conference with the each pair during the period to see if they had questions, needed feedback and as a general check-in to see if they were going to make the deadline.  First, though, the students “conferenced” and helped their teacher with his math game.

By the end of math on Wednesday, most of the groups were very close to having a working game.  We decided another half period might be warranted.  Then we’ll share them and try them out.

I heard one student say this coding stuff was great and he wanted to sign up for the next round of Code Club.

Oh, yeah, Code Club was great too. Everyone busy working on their own games.  Recording their voices.  Being successful, or at least satisfied, in drawing their sprites and backgrounds. I really enjoy troubleshooting Scratch projects and seeing all the creative and interesting ideas these 4th graders have.  My volunteers are really great, too.