Fractions to Decimals

I created a Scratch lesson for my 7th grade math class this week. It is a starter project but I wanted the students to have a bit of practice with Scratch before we do a more complex math modeling project in November.

(First a bit of background – I’m student teaching middle school this fall and should have a 5-8 Math teacher certificate by the end of the year.  I’ll be back at my elementary computer lab position after that and I’ll run my code clubs in the winter.  I’m still leading Creative Coders Club at the local public library once a month.)

Screen Shot 2018-10-14 at 7.06.42 PM

The 7th graders have been learning about expressions with variables, integers and rational numbers. For this introductory project I had them create a fraction to decimal converter. Have the user give two integers and use division to give back the decimal.

Screen Shot 2018-10-14 at 7.04.17 PM

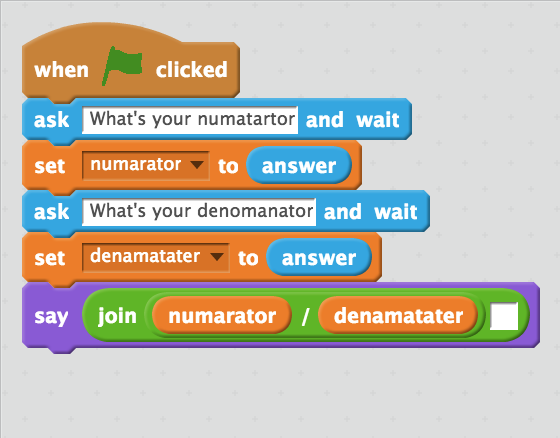
Basic code for project (with spelling errors).

I set up a Scratch teacher account with classes for the each section of 7th grade math then put the class invites into our Google Classroom.  This worked well since we were using Chromebooks.  I’m not sure how students who already have a Scratch account would be able to join our Scratch class, but the students seemed okay with making accounts.  I gave a few suggestions on setting up account names.  The only hiccup we had was when they went back to log in a second time, many went through the class invitation again and then couldn’t log in without setting up a second account. (I hope there is a way to remove those extra accounts.)  Adding a direct link to Scratch in our Google Classroom and giving clearer instructions alleviated this problem.

I set up a studio for each class but I gave them the exact same name.  This confused me later when adding projects to the studio I couldn’t tell which went with which class. Luckily you can easily change studio names.

Rational Number Period 1

Rational Number Period 4

After the first day of working on the project, I decided that I needed more formal assessment of this project so I adapted a rubric from the Scratch Ed one here and set up some test cases for the students to use to test their projects.  Testing is an important part of programming.

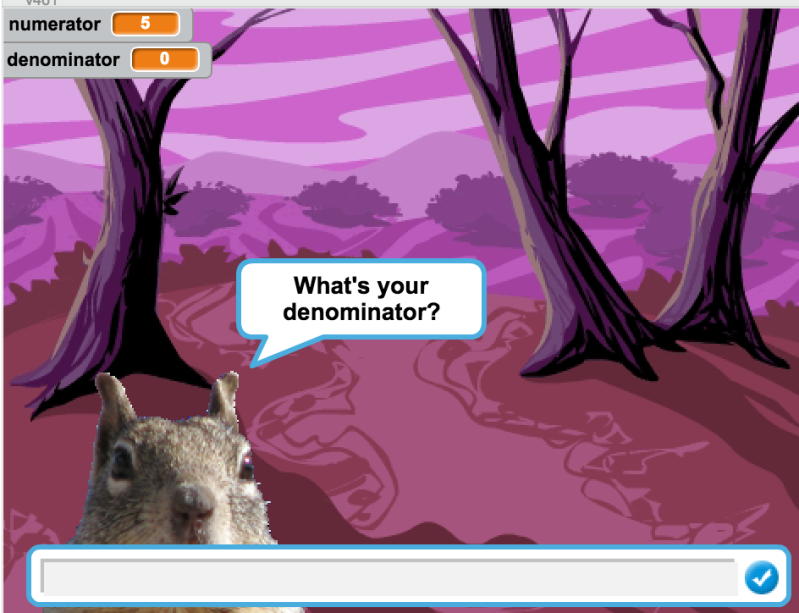
Students seems engaged and excited to be working in Scratch. I’m pleased with the turnout of completed projects and quality of the work.  There are some missing instructions and spelling issues but even I spelled denominator wrong in my example and a student had to point this out to me. A number of students came in during study hall to work on their projects.  One student who was new to Scratch and our school just had the biggest smile when he learned about the color and whirl effect options.

Screen Shot 2018-10-14 at 7.06.07 PM

New coder excited about Scratch

And one of our struggling students went above and beyond with her project.

Screen Shot 2018-10-14 at 7.05.16 PM

Excellent project

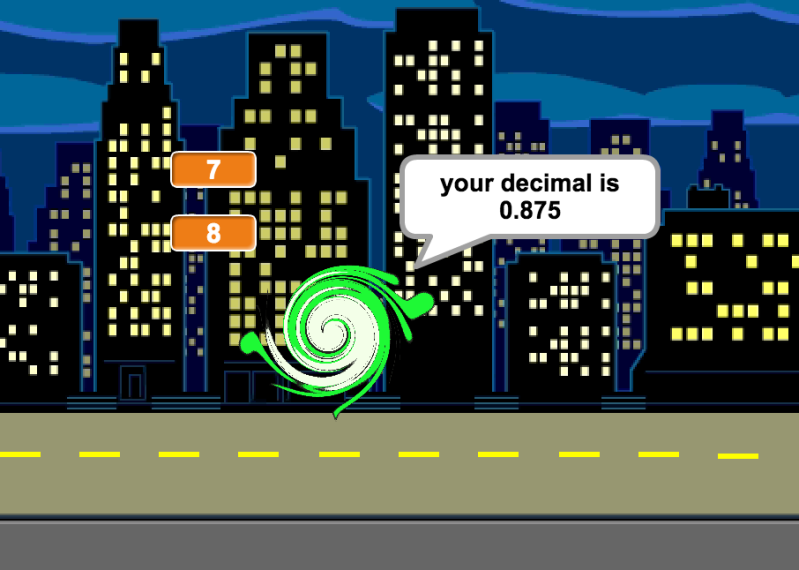
One issue I inadvertently avoided was the fact that Scratch will round decimals to two places in say blocks unless they are inside join blocks.  The Scratch Wiki mention of the Offline Decimal Trick  is the only reference I found in support of this feature.  Fortunately my directions were for student to use the join block to join “The answer is ” and the answer.  This allowed the students to see all of the interesting repeating decimals and weird rounding that appears from converting rational numbers into decimals. I didn’t notice this happenstance until I was helping some students finish at the last minute and we took a short cut for the last line and just put the answer in a say block. It took me a while to figure out what was going on.

Screen Shot 2018-10-14 at 7.03.23 PM

Without the join block, decimals are rounded to 2 places.

Here is the lesson I designed: Decimal Scratch Project If your students are really new to Scratch it might be advantageous to print the first page in color so the students can see where to find the blocks. (I guess I’ll have to update this when 3.0 is released.)

I wondered if any student would try to divide by zero.   Scratch will return the answer “Infinity” in this case which could lead to an interesting math discussion.

Forever, Until Done

I’ve been noticing interesting uses, or misuses, of Scratch’s ‘forever’ block.  I applaud Scratch for it’s fail soft policy and understanding the desire of 10 year olds to test things, especially to their limits.

screen-shot-2017-01-12-at-5-52-13-am

Nested forever loops will get the job done

The ‘forever’ block seems pretty self-explanatory and perhaps that means I don’t introduce it properly. My students tend to use it in 3 ways: repeating actions, for event listeners and for looping background music.

screen-shot-2017-01-12-at-6-18-45-am

Repeating an action forever

I introduce the forever block after introducing the repeat block.  Once they know about it, there is no going back!

In many games you wait for a certain action to happen to respond to it. One way to do that is to code some ‘if statements’ and set them in a forever loop, like an event listener in other coding languages.

screen-shot-2017-01-12-at-6-15-12-am

Listening for the win condition

Many, many students want use it for play background music for their games.

screen-shot-2017-01-12-at-5-54-27-am

Two dance tracks in a forever loop.  Both seem to work, together.

And I think it is with the ‘play sound’ block where things gets confusing.  I am a proponent of ‘play sound until done’ in a forever loop, and the Scratch Wiki concurs, but it seems to work without the ‘until done’ if it is the only thing in the forever loop.

screen-shot-2017-01-12-at-6-18-55-am

Even without the ‘until done’ this code plays the whole song in an infinite loop

Other things I’ve seen makes me wonder. Why did the Scratcher feel the need to use the forever block?  Was some other code interfering with their action?

screen-shot-2017-01-12-at-5-57-33-am

What would cause the need for show in a forever loop?

Or are they just testing things to see what works and what fails.

screen-shot-2017-01-12-at-5-52-59-am

Forever and ever and ever and ever, just in case repeating 10 to the power of 109 times isn’t enough!

Thanks Scratch for not failing them.

Catch ’em

Week 2 for Code Club happened.

We did an old project game called Felix and Herbert which I’ve done before.  It’s not on the list of current Scratch project at Code Club World, but its simple concept with different movements- follow mouse movements- makes it a good second week project. It is a cat and mouse game and introduces some good game elements such as broadcasting and keeping score.

screen-shot-2016-10-17-at-6-31-44-pm

I allowed the students to pick any two Sprites – one to chase and one to be chased.  This let to some creative pairings.

screen-shot-2016-10-17-at-7-19-40-pm

It also became important in debugging to know which Sprite was which. When introducing the project I did point out where it says “Test your project.”  I let them know that this was a big part of programming.  I think I’ll need to emphasize that each time. I notice a lot of creative testing – playing with sounds, looks, speed, scoring, but not much debugging or referring to the project pages when things don’t work.

screen-shot-2016-10-17-at-6-29-48-pm

At the beginning of Code Club, I decided, we would add a bit of reflection to our meeting. On Wednesday I asked how the first code club went?  What were the successes and failures.  Many noted that they ran out of time or weren’t able to get the sensing of the edge of the maze to work.  I told them that it was a difficult task and if they were able to set up the Sprite to use the arrow keys, that was a success.

With Thursday’s group, I asked them to share one thing they found that they liked about Scratch.  This time I asked for positive responses mostly because they’d only played with Scratch and hadn’t really tackled a whole project yet.

I enjoyed this reflection time.  These are big groups and I don’t always get to connect with each student during our hour of coding.  Afterward Code Club I do take the time to look at the projects they save, highlighting a few here and noting any trending issues. And, of course doing my own reflecting on this blog.

I must say that my volunteers are awesome!  They work very hard fielding questions, debugging code, working with students. Even so, I think the students are asking for help too quickly.  They need to look at the project more closely and begin to do a bit more problem solving themselves.

screen-shot-2016-10-17-at-6-31-22-pm


A New Plan

(I know, 3 blogs in one week.  Bear with me. This one is short)

I spent some time over the weekend hashing out the project plan and learning objectives for my two code clubs.  I feel better with a plan and ideas in mind and on paper.

I also revised my expectations for last week.  My learning objective for the students last week was to get to know Scratch and the code blocks that include Events, Motion, Looks and Sound.  I have to remember there’s also a new costume editor they will have to get a feel for as well as the notion of the Stage and Sprites and how they are different.  That’s actually a lot. I think the majority of the students have got a grasp on some of those concepts. (If they haven’t forgotten them in the meantime)

One student came up to me today and said, “I wish Code Club was everyday!!” What an awesome sentiment.

This week I’d like to focus on Initial Conditions, Conditionals and Sensing blocks. To that end, I’ve updated the maze project to use for Scratch 2.0. And we will try it out tomorrow.

Screen Shot 2015-10-12 at 8.39.24 AM Screen Shot 2015-10-12 at 8.57.42 AM

Scratch 2 Maze Project – Google Docs

I wonder if I’ll have time to mention the “Think like a Programmer” ideas of make one change, test it, make another change, test it?

Then next week both clubs can work on the same project.

Showcase #2

Last week in Code Club we held a showcase of our projects for the parents. It went rather smoothly and I actually was able to enjoy it. Quite a change from the first showcase at the end of the first term! I felt prepared and felt the students were, too. Plenty of factors contributed to the improvements from round one.

Screen Shot 2015-03-30 at 10.08.59 PM

Maze Game

This time a majority of the 17 projects were ready to go by the end of the Code Club meeting prior to the showcase. Most projects were turned in so I could upload them to the online Scratch Studio ahead of time. I credit a number of reasons why this happened. First, some of coders had been through the process before, which helped. I think those students had a better idea of how big of a project could be accomplished and set better goals. Projects from Showcase #1 were good models for what could be done. With the help of two high school volunteers and self-designated expert code members, much progress was made in the time available.

I was more organized. I kept track of the projects and checked in with groups during the last weeks. I knew that the projects needed to be wrapped up a week before and was able to encourage most groups and individuals to keep to this timetable. I had a shared folder for students to save their projects to. I used time during the week to touch base with code members about their Scratch project page and to get the Code Club website ready for parents to navigate to.

Little Airport

Little Airport

I also helped troubleshoot some last minute bugs, found a lost project and let one student have some recess time because he had been absent.

The results of this effect meant that when the students got to Code Club on the day of the showcase they had 40 minutes before the parents arrived. We used this time for them to write their presentation -which they all did rather quickly. Then, once I had their presentation notes, they were free to test each other’s projects until the parents arrived.

Presentation outline

Presentation outline

Giving them time to play test each other’s projects before hand really helped the code club members enjoy the presentations they gave to the parents. I did error in the order of presentations and a new-to-Scratch student presented first. He was nervous, but he did fine. The students were not loud enough for the whole room to hear – but it was a very busy room.

OLYMPUS DIGITAL CAMERA

I was pleased with the turn out of parents. We filled the room and had to bring in extra chairs. The students were so proud of their work and I am so proud of them. It was a lot of work to get ready, but it was so much more enjoyable the day of.

Afterwards I took my two high school volunteers out to dinner to celebrate a job well done. I was grateful to have them help out each week. They both expressed how much they enjoyed helping out. I think they might be back next year.

I have plans to continue to my code club journal periodically until the next round of Code Club starts in the fall, but I may be just kidding myself.

Key Steps in Game Design

For the next four weeks of Code Club the students are going to make their own game in Scratch. This is the reason they joined.  This is what they’ve been telling me they want to do. I could just let them go at it but I want to help them be successful so I’m making them follow some guidelines.  In fact, I’m having them create a detailed plan, put their ideas down in a GDD (Game Design Document), and pitch it to me or another adult volunteer before they start coding.

Last time we met I handed out this Scratch_ Game Design Document – Google Docs  GDD template. I created it after looking at a number of sources from the video game industry and from some online teaching projects. It’s a revised, more detailed version of one I used last year with my 4th grade math group when they made Scratch Math Games.  Code Club members have the choice of working with a partner or by themselves.  The game planning was their homework. It is due tomorrow.

I also sent home Code Club World’s Create Your Own Game Project idea packet for some basic directions.

The last time Code Club met, we had a special guest speaker. She is a parent volunteer who manages a team of software developers and she came and gave a nice presentation on key software development steps: Planning, Testing and Time Management. For a fairly dry topic, the students were respectful and attentive, which I greatly appreciated.

Software design steps outlined

Software design steps outlined

Here are some of the great points she touched on:

  • Make a plan – think about the steps it takes and how long to do each step
  • What if I want to add a really cool thing that was not in the plan? Make your plan flexible
  • Sometimes you have to move on even if something is not perfect
  • Test and test again – test often, get other people to test

These are real world ideas from, well, the real world.  They seemed to take the presentation seriously and I hope that means they’ll do a good job on their pitch tomorrow. I’m excited to see what they’ve come up with and a little nervous, too.