3d Printing Art Class

I’ve been working with AVA Gallery and Art Center, a local art gallery that offers a large variety of art classes, workshops, and drop-in sessions, to develop a 3d printing class for middle school students. My first class offering is a 5-week, afterschool, 2-hour class for a maximum of 8 students. AVA has a media lab with desktop computers and room to set up my class.

I am supplying my own 3d printers and filament. I have acquired 4 Monoprice mini delta 3d printers for use with the class.  I use a delta printer to run a demo when I’m selling my 3d printed earrings and magnets.  They are highly portable and fun to watch.  We print a different figurine during the summer farmers market each week. Kids are always stopping by to see what we are printing (adults, too).  It generates a lot of curiosity and questions about 3d printing.

IMG_2116

Monoprice Mini Deltas running

For this first session, I have 3 students signed up, 2 girls and 1 boy.  The low number is fine with me because it gives me a chance to run through the mechanics of the class, seeing if my lessons hit or miss.  The students are young middle schoolers – 5th and 6th grade.  I know two of them as they are local and used to go to the elementary school where I work.

My plan for the 5 weeks was to start with BeetleBlocks– rings, nameplates, and Turtle-logo like pendant designs, then switch to TinkerCAD and go from there.  On the first day, I found out that only one of them liked jewelry and was excited about rings, earrings, and necklaces.  The other two, not so much.   They coded and printed rings in BeetleBlocks but weren’t interested in going through the iterative process to reprint them to fit better. Oh well.  While the rings were printing they explored BeetleBlocks, made nameplates or checked out community made designs, but then they were done.

Screen Shot 2020-02-04 at 10.40.12 PM

The next week I introduced TinkerCAD.  I showed them different options for TinkerCAD and let them explore but didn’t direct them to make anything specific.  One student had a very specific figurine in mind but only a beginner’s set of skills and became frustrated. The computers in the lab are also really slow and TinkerCAD was lag-y.  I was telling them to click and breathe for a bit there. One student worked on his project from home and reported that it was quite a bit less frustrating.

IMG_2213

TinkerCAD design worked on at home.

On the third week, I decided to introduce them to lithophanes since TinkerCAD was painful to use.  We went to http://3dp.rocks/lithophane/ and uploaded a photo.  I need to play with the settings a bit more, but Deltas print 3d lithophanes very nicely since the bases don’t move.

IMG_2214

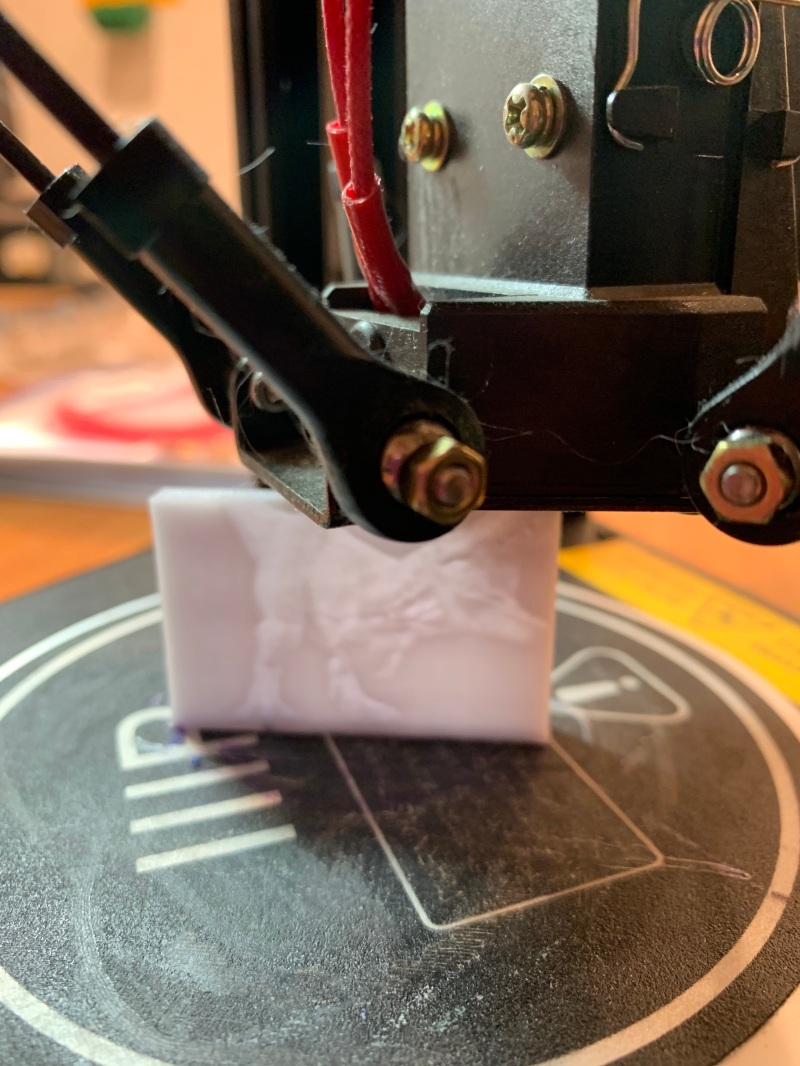
Lithophane photo printing vertically.


Next week we are going to search Thingiverse and find something to print. I hope Thingiverse isn’t laggy.  It has trouble loading projects even on a good day. I have an idea for the last week. I think we will make a mobile of our 3d prints to showcase the class and hang it in the AVA.

The students are getting skilled at running the deltas -preheating, loading the filament, extruding, printing. I’m doing the slicing and the gcode generation this time.  I’d thought to install Slic3r on the computers in the media lab and teach the students to slice and generate gcode, but I’m currently doing those steps.

A note for utilizing printer time during class:  As one project is printing, the student work on the next project to have ready to print at the beginning of the next class.  If there were more students, I’d probably have to spend more time out of class printing.

3d Printing Club

I have wanted to run a 3d printing club for middle schoolers for a while now (since I discovered BeetleBlocks).  I specifically wanted to have a 3d printing club where we focused on jewelry making in hopes of getting MS girls interested in STEM. I have a 3d printing business and sell my 3d printed jewelry on Etsy and at the Lebanon Farmer’s Market. I see many of my students at the market and know that 3d printing jewelry might be the hook to get more girls interested in 3d printing.

Screen Shot 2019-07-17 at 9.10.43 AM

My earring design ready for sale – a shared project on BeetleBlocks

Yesterday my dream of having a 3d printing club became a reality at the Lebanon Public library and with the collaboration of two librarians. We were able to borrow two 3d printers from libraries around New Hampshire and schedule a couple of summer sessions.  We met a week prior to the first session, when we had the printers, to make sure we could run them and change the filaments, etc.  We have an Ultimaker 2 Go and a MakerBot Replicator.  This is a bit complicated as they take different size filaments and use different programs to prepare the models.  We have some jewelry findings and different color filaments – silver, gold, bronze in 1.75 mm for the MakerBot and blue in 3 mm for the Ultimaker.

We were hoping to get 3 printers and have 3 students per printer for a group of 9, but only 5 had signed up so we opted to go with just 2 printers as the third was at a library on the other side of the state.  When I got there on Monday, there were 9 students.  The librarians had decided to let the drop-in students stay and I was fine with that.

Screen Shot 2019-07-17 at 9.14.52 AM

My notes for my intro to the 3d design & printing process.

After a brief introduction where I wanted to make sure that they understood 3d printing was an iterative process not unlike the engineering design process, I showed them a jar full of bad prints from my jewelry printing business.  Then we got started.

Screen Shot 2019-07-17 at 9.09.47 AM

For the first of the two sessions, I introduced BeetleBlocks and we created simple rings by measuring and using a tube shape (Here’s my video tutorial). In just three lines of code, the rings were created and we were able to have them export and save to a flash drive/sd card.  We loaded half onto one printer and half onto the other and started printing them. Rings take about 5-9 minutes each.  The goal was to have something to take home by the end of the session. Then during the week they could drop in and print another, bigger, individual print like a pendant or a pair of earrings, etc.. The librarians had a list of times when they would be available during the week to help the students print another ring or a pendant.  I thought this would alleviate the problem of having enough class time to get everything printed.

I created a second video tutorial on how to code a pendant or earring from a squiggle. There wasn’t time to go over the whole tutorial during the session and anyway students were busy exploring BeetleBlocks: adding their names to the rings, looking at community projects, playing with extrusions and other shapes. While some just wanted to watch the printers for a while.

Screen Shot 2019-07-17 at 9.09.02 AM

Extrusion pendant by a middle school coder

Next week we are going to explore TinkerCAD as another application that I know that makes it easy to create 3d designs.

BeetleBlocks Tower

My math students are coding a tower in BeetleBlocks.  This is a project that I have wanted to do since a 4th grader last year designed a tower in BeetleBlocks. He called it the Sears Tower.

Sears Tower

4th grader designed  Sears Tower

I set up the engineering project with the following constraints:

Engineering Task: Use the Shapes menu blocks cube and cuboid to build a tower.

Constraints: 1) You must use at least 5 Shapes blocks. 2) Each shape must stack on top and be smaller than the shape below (no overhanging blocks) 3) The total height must be 100 mm or less (but greater than 80mm) 4) the base must be 35mm x 35mm

When I introduced the project I said we would use the Engineering Design Process  (Ask, Imagine, Plan, Create, Improve).  I explained the constraints and let them ask questions. They would need a written plan of their design with a bit of pseudocode* before I would let them on the computers.

(*I used the word pseudocode and one student thought I said Sudoku.)

Drawing from the Center

Next, I explained a bit about how the beetle draws the shapes from the center.  This is the big concept for this project.  They would calculate the center height, move the beetle, draw the cuboid, move to the center of the next cuboid, etc.   I modeled an example of a plan and pseudocode on graph paper:

OLYMPUS DIGITAL CAMERA

Pseudocode on the left, block tower start on the right, z height line in the middle.

One thing I learned was drawing the model in 3d wasn’t necessary, in fact, it was probably confusing.   The students’ models were easier for all of us to understand if they drew them in 2d and just concentrated on z height and moving the beetle to the center of the next cuboid.

We spent the rest of the class period working on their plans. One student was going to use a repeat block and make a tower of all the same blocks, so I had to change the constraints to specify 5 *different* cuboids.  A number of students were stuck on the calculations from the center.  I suggested they move to the center, draw, move to the top, move to the next center, draw, etc, breaking the problem up into smaller parts.

The next time we met I reviewed BeetleBlocks coding and suggested they use Wireframe to see inside and the beetle at the center of their block.  BeetleBlocks also displays Position (the 3-d coordinates) of the beetle, so they know the z-height.

Screen Shot 2018-05-28 at 9.36.18 AM

Partially coded tower and wireframe displaying beetle at the center of the upper cuboid.

If they were happy with their paper plan they could go right to BeetleBlocks. About half the class finished their coding by the end of the class and I’m busy printing towers on our little Printrbot Play.  Another thing to note is that the minimum size of the cuboids should be 3 mm for ease of printing.

A few of them will need improving before theirs will be printed.  I noticed a few cases where the blocks were nested not stacked on top of each other.  This tells me the student is not coding z-height correctly, which is the concept I am trying to teach, beyond calculating centers of cuboids.

Screen Shot 2018-05-28 at 9.47.36 AM

Nested blocks showing me the student hasn’t coded z-height correctly.

Set versus Move (Change)

There are two different ways to code the beetle to change z height.  One way to set the beetle to a specific z coordinate and the other is to move or change z by a certain amount.  These are two different perspectives to use and I let them choose which way makes more sense to them.  Set versus change statements can be confusing when programming and cause unexpected results.  Here we can look at the model using the wireframe setting and see what is happening.

One student is making a pyramid of blocks, each block 1 mm smaller (width, length) and 2 mm in height than the previous.  He is hard coding each block.  I’m going to suggest he use a repeat block and a variable.

Screen Shot 2018-05-28 at 9.53.41 AM

Code suggestions on the left for the pyramid making tower code on the right.

This project is turning out well and I’m learning a lot along with the students. I can print each one in less than 2 hours by setting the infill to 10% and cranking up the speed.

I’m surprised no one has created a double tower or thought to rotate on the z-axis to give the tower a bit of twist.  Dare I suggest these things?

Code to Print

Code Club is on a break until the end of February. Meanwhile 4th grade students have been coding during alternative recess opportunities when the lab is available.

I have seen a growing interest in coding in BeetleBlocks now that we have a 3d printer available to print artifacts and I am quite thrilled.  Most 4th graders have had an introduction BeetleBlocks when we used it to print their names (I have one more 4th grade class to schedule), but printing names of their friends or teachers still interests them.

OLYMPUS DIGITAL CAMERA

Some 3d printed names

Some are just curious to print a single shape – cube, cuboid or sphere. Spheres are the hardest to print – even with a small cuboid base, they don’t print very well.  Students seem to love the prints that “blow up” as well as the successes.

I asked the snowman creator to add a cuboid below so the print would be successful, and it was.

screen-shot-2017-01-24-at-11-49-00-am

Snowman artifact

Recently I printed a cannon that a student had made in BeetleBlocks for a social studies report on the Middle Ages.  I asked him to break the code into 2 parts – the barrel and the base thinking that would help the print be successful.  It printed out well enough.  We glued it together with a 3d pen.

20170202_100616

Cannon printed in 2 parts, glued together with a 3D pen

What surprises the students the most is the size of the print compared to what they see on the screen.  Even though we went over the the numbers translate into millimeters.  I try not to scale anything but instead make them go back to the code and change it there.

Recently I printed a pair of rings.  There have been some other rings coded but this was the first project that reached the export to print stage. The 4th grader had started on Monday and measured her finger (with the mm calipers) to code a tube of that diameter.  Then we added a sphere on the top.  That was all we had time for on Monday.  On Wednesday she came in with a list of code she had written down.  She had worked on the project at home and didn’t know how to save it so she wrote down the code and brought it to school.  She also measured her friend’s finger to print one customized for her.

screen-shot-2017-02-04-at-6-39-03-pm

BeetleBlocks rings

OLYMPUS DIGITAL CAMERA

A pair of printed rings

It only took a few minutes to print.  The size will need some tweaking, but I suspect I will be printing more rings in the future.  We’ve shared the project for others to see or use.

In September I wasn’t sure what 4th graders could do with BeetleBlocks and every week they surprise me with their creativity.  I hope to report more on their explorations in the coming months.


Your Name in BeetleBlocks

In December my school’s PTO approved my grant for a 3D printer. Yes!  Now we can print 3D artifacts using BeetleBlocks.  My idea for the 4th graders’ first project is to design a 3D model of their name using BeetleBlocks code.

20161210_141806

School name printed by school printer using Beetleblocks code

I started with one of my math enrichment groups first. They were my small group test of the idea. This group has played with BeetleBlocks but most recently had been making math games in Scratch.

It only takes about 5 blocks of code to write your name and make a cuboid to keep all the letters together.  It takes a little bit more time to make decisions about the size of the text, the size of the cuboid and where you want to put the block that keeps the letters together.

screen-shot-2016-12-28-at-6-54-32-am

basic code stub for project

I gave them the constraints that their name had to fit on the BeetleBlocks grid (20 by 20 ) but they could have their name with the support cuboid behind or below.

Screen Shot 2016-12-28 at 7.25.50 AM.png

Name on grid with support cuboid below

The technically difficult part was getting the STL files saved where I could access them and that only had to do with the way our computers are networked.

20161216_204842

3D print of name with cuboid behind

The students were really excited about everything and just wanted to sit around the printer and watch it print.

20161216_142746

I was able to print three names at a time. I would have been able to print all nine students names in the time allowed, but I got cocky and changed filament in the middle and that caused a jam that I was not able to resolved before the end of the day.

20161216_213419

3D prints in MakerGeek’s Crystal blue PLA 

You have to understand that the printer arrived at school on Monday and we were printing this project on Friday. On Monday, the 4th graders voted on the filament color for their grade (Crystal blue, by the way) and on Friday, during the middle of printing, the filament arrived!

Based on this experience, I made a one page handout 3d-model-your-name-in-beetleblocks for the next time.  The next group to try this will be the rest of the students in this class.  These first nine will be my experts and help the rest of their class code and export their models.  My goal is to have all three 4th grade classes code and print a 3D model of their name.  Then I’ll try it with the 3rd graders.

The only curious thing I’ve found with BeetleBlocks is the rotational changes that I have to either code up front or adjust in Cura (printer software) to get the correct orientation for printing.

screen-shot-2016-12-11-at-8-36-21-pm

Strangely, when I save the model on the left, it will import into Cura with correct orientation for printing.


Details about our 3D printer:  The grant was for a $400 Printrbot Play.  It is a small printer with a small print bed size – 100 x 100 x 120 mm.   The Play received a few nods from MakeMagazine and 3Dprint.com 3D printer guides. I also have 2 years of experience with Printrbot printers – we have a personal Printrbot Simple at home.

20161216_141121.jpg