Change in Plans

I’ve been thinking about a comment I heard from a student at the Showcase of projects earlier this month.  He was testing his game out before the parents arrived and said, “It isn’t how I imagined it would be, but I like it.”  I think that explains many coding projects. You start with an idea, plan it out but during the coding of it you end up with behaviors you didn’t expect, or you have to make compromises to fit the limitations of the language or your ability to code in that language. You might even like the results better than what you had planned.

I went back and looked at their game design document, and he’s right.  The finished game is not what they (he and his partner) had originally planned.  They did want an adventure game where there would be Sprites to avoid and a “boss” Sprite to defeat.  It was going to be two levels – one in space and one underwater.  There were going to be coins to collect.

Screen Shot 2016-05-31 at 8.26.20 PM

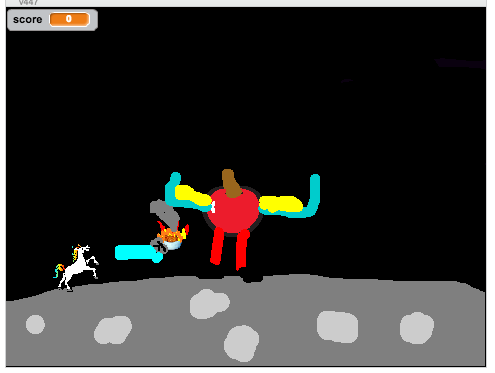
In the end, they were able to code one Sprite that you have to avoid – the Cheetos monster and one “boss” Sprite – the Apple guy.  You, the unicorn, has to jump on top of the Apple guy to get points.  They call their project IDK Adventure.   In their presentation they said their favorite part was the Cheetos monster and that if they had more time they would add a different background and add more Cheetos.

Screen Shot 2016-05-31 at 8.40.09 PM

It doesn’t look like a lot of code, but it was quite challenging for them.  They spent one Code Club just working out “gravity” where the logic was to only “fall” (change y) when not on “touching” the “gray” moon.   Then to get the points for defeating the Apple guy, you have to jump on the top “touch the brown color” part of the stem.  The Apple guy hides when you touch him, so it is a challenge to win.

They weren’t the only pair to have to settle for something less than they were hoping to complete, but they seemed happy with the project they were able to finish.

Screen Shot 2016-05-31 at 8.48.03 PM

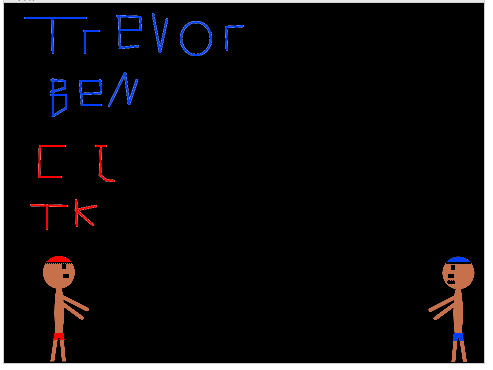
Their Game Design Document had them designing a wrestling game where you play against the computer. If you jump on your opponent, you go to the next level. I think they changed their minds about what they wanted from one week to the next, or they weren’t sure if they wanted a 2 player or 1 player game.  In the end, they weren’t able to get the fight behaviors to work the way they wanted. Screen Shot 2016-05-31 at 8.54.37 PM

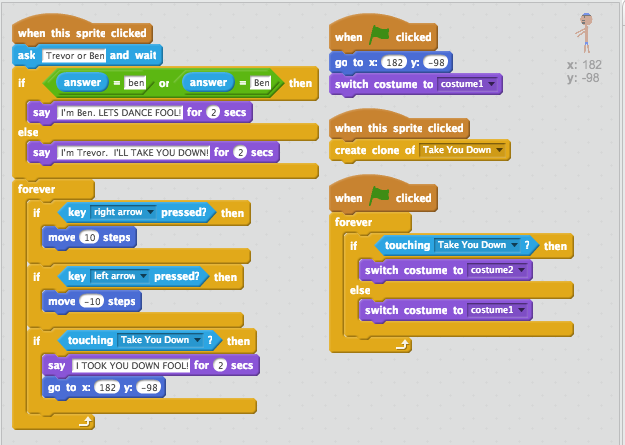
While you do get to pick the player you want to be, there’s not a lot of animation of the wrestling match.  There’s a bit of smack talk. In the end their favorite part is the cloning. I don’t know how this became part of their project, but they’re right.  It makes a great addition to Daboomdocbros,  even if it wasn’t planned in the beginning.

These are two examples of projects that did not turn out exactly as originally imagined.  As with many creative processes, the end results doesn’t always match your original idea.  I don’t consider this failure, and I’m glad my students don’t either.  I’m hoping their flexibility in working with the design process will serve them as well as their introduction to coding.


Dress Up for Showcase #5

Tomorrow is our fifth Code Club Showcase.  We have eleven projects to present.  They are solid projects.

Over the last two weeks I wasn’t sure if we were going to be ready, but here we are.  I’m actually impressed with the variety and the effort.  Many students choose to work with a partner and those partnerships worked well.  I would have liked to have seen more coding effort and algorithmic thinking but everyone seemed to have fun each week working on their projects.

New this time are projects like dress up. I haven’t seen a dress up project before in Code Club, but I think these two turned out well.  The idea is simple.  Pick the clothes for the Sprite and then decide on the Stage.

Most of the time was spent designing clothes, which has got to be the most fun in the mind of these two girls.  Each of the clothing Sprites have the same code behind them.

Screen Shot 2016-05-17 at 9.54.26 PM

The code sets the initial conditions and then makes a decision not to disappear if the Sprite (named Kate) is wearing the piece of clothing.

I can see improvements to the scripting to allow the Sprite to move in the chosen outfit. As well as other ideas that turns the Dress Up project into more of a Virtual Pet project.

We did a Virtual Pet project one week this session and one student decided to make a full blown virtual pet project for her individual project.

Screen Shot 2016-05-17 at 9.40.02 PM

It is really cute and well coded.  I find the directions she gives quite funny.


Cloud Project

With the success of the 3rd grade Superhero Scratch project in March, I decided to see if 2nd graders could make a similar project and be successful.  They study cloud types as part of their science curriculum so that’s the direction I went.

Screen Shot 2016-05-04 at 7.17.20 PM

This project was very similar to the 3rd grade project but the drawing was easier – simple background and a white cloud – although even that turned out tricky.  I trimmed down the code required to 5 lines.  Still it took a while to complete.  I have 2 of the 3 class videos completed.  The other class just needs to Record Project Video and I’ll have all of their clips ready to put together.

Step 1:  Introduction to the project:  I showed the class what the project was going to look like and laid out the steps we were going to take.  Many were excited that they were going to be on YouTube.

Step 2:  Draw the Background: In the computer lab we used Paint to draw the background.  I modeled drawing a horizon line, then using the fill bucket to fill in the sky and the ground. This could be done in Scratch as well.  Save the Paint project and research clouds while everyone finishes up.

Step 3: Draw the Cloud: We used Paint to draw the cloud.  I modeled filling in the background with gray or light blue and then using different Paint brush types in white to draw the cloud they had chosen: cumulus, stratus or cirrus were the 3 types that we ended up using.

Screen Shot 2016-05-04 at 7.13.45 PM


Here’s where Paint and the different brush types helped add texture to the clouds.  Save again.  (I basically did one step per lab time, just so I didn’t lose anyone)

Step 4:  Import the Assets into Scratch 2.0 (offline editor) – this was their first time in Scratch so we had to look around and notice the Stage and Sprites, code blocks… etc.  Then we “cut” the Scratch Cat away and imported our background to the Stage (our Paint file didn’t quite fill the Stage, but that turned out not to be important when the video was cropped to  wide-screen in production)   Next we added our cloud Sprite.  The Sprite included the gray or blue background but we removed that with the fill bucket by filling in “nothing” or “invisible” over the background.  I’m not sure what is the best term to give to setting the alpha channel. This was a bit of a tricky part.  Also resizing the cloud. Save the Scratch project – I had them save it in their picture folder where the background and cloud files were.

Screen Shot 2016-05-04 at 7.12.58 PM

Step 5: Coding the Animation: It’s only 5 lines of code.  When the green flag is clicked, the clouds says it’s name and then floats to the left or right forever (bouncing off the edges). When I modeled this, we noticed that 10 steps at a time is too fast for a cloud.  1 step is more cloud-like. I made half-sheet printouts of the 5 lines of code.  I wrote the cloud names on the board so they could spell correctly.  Saving really seemed to be our biggest issue.  I did spend some time troubleshooting clouds not to flip upside-down or go off screen.

Screen Shot 2016-05-04 at 7.18.18 PM

Step 6: Record Project Video:  The last step.  I wrote up a detailed step-by-step for my sub, hoping it would happen. The other two classed did a great job but occasionally would forget to click the green flag, so we got 20 seconds of a un-animated cloud.  Having the 2nd graders do this step is a big time saver for video production.

Screen Shot 2016-05-04 at 7.14.47 PM

The next step was for me to convert the project files from .flv to .mov or .mp4, (I used Free MP4 Converter  software) put them together in movie making software (I use a iMovie at home, but WinMovieMaker at work), find some cloud music –Ferde Grofé’s Grand Canyon Suite seemed to fit the bill. And finally, upload to YouTube.  I showed one class their video today and they were pleased, although some couldn’t pick their cloud out of the group.  -hmmm, maybe a bit more customization of the background…


Here are the links to the YouTube videos:  MacNeil’s Class Video & Horne’s Class Video

I will see next year when these students are 3rd graders if making the Superhero project is easier or if we can do more with it.  I wasn’t able to do this project with all the 2nd grade classes, but it is a start.